Tiling and Concrete: 9 things you should know
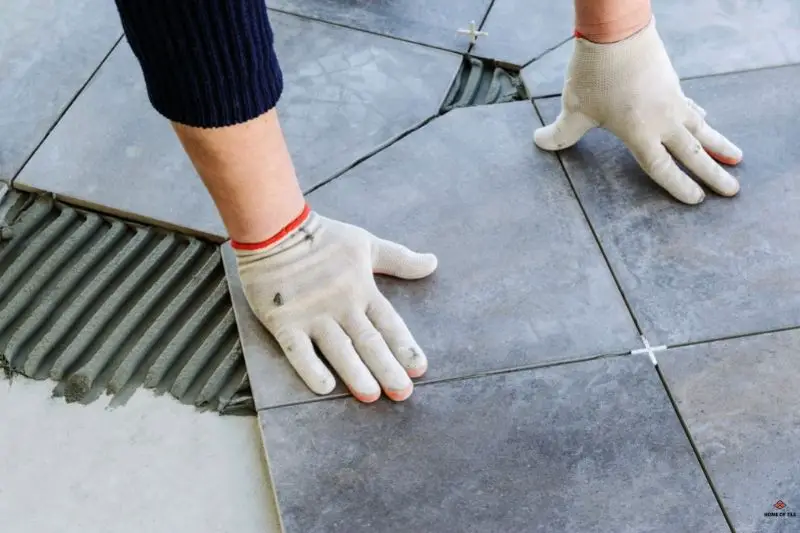
Tiles require a solid base to be installed properly. Having concrete underneath the tiles that act as a subfloor is a great option. Installing tiles directly on concrete is possible if it is in perfect condition. Otherwise, if there are cracks on the surface, you will have to take precautions by uncoupling the tiles from the surface. For this, you can use self-leveling concrete or membranes such as Ditra. They form a layer between the concrete and ensure that the concrete’s cracks can not damage the tiles.
This article will provide you with information regarding tiling over concrete floors, walls, and wet rooms. It will also discuss the installation process of tiling over expansion joints and cracks. If you are interested in laying tiles on your concrete floor or wall, go through each section of this article to learn more.
Contents
- 1 Tiling on a concrete floor, some helpful tips:
- 2 Tiling on concrete with expansion joints, step by step
- 3 Tiling on a concrete wall, some helpful tips
- 4 Tiling a wet room floor on concrete, some helpful tips:
- 5 Tiling on a new concrete floor, some helpful tips:
- 6 Tiling over a concrete patch, follow these steps:
- 7 Tiling over cracks in a concrete slab, some helpful tips:
- 8 Tiling over linoleum glue on concrete, some helpful tips:
- 9 Tiling over painted concrete, some helpful tips:
Tiling on a concrete floor, some helpful tips:
Tiles can be installed directly on a concrete floor because of their heavy, solid, and unbending properties. However, the concrete must be in its perfect state.
Concrete is a perfect floor for tiling due to its heavy, dense, and solid properties. However, it responds poorly to foundation shifts and can often get cracked by groundwater, tree roots, or other issues. The force of groundwater pushing upwards against the concrete damages the material and causes it to crack. Any tree roots under the concrete slab may lift the material, eventually cracking it.
It must be kept in mind that at some point in its lifespan, concrete will crack. You can install tiles directly on the concrete, but problems arise when concrete cracks or experiences shifts. The movement in the concrete is transferred to the tiles installed on top of it. The cracks in the concrete cause tiles to crack eventually. If you were to remove a broken tile and look at the concrete laying underneath it, the crack pattern would be identical.
Most people use cement backer boards over a cracked concrete slab to reduce the workload and save time. However, the safest option would be to repair the concrete. Portland cement-based fillers can be used to fill the cracks and gaps in the concrete. Attempts to paint the concrete to cover any small gaps is not a good approach as the gaps are not filled in this process. Tiles can not be installed over painted concrete because the thin-set under the tiles will not adhere effectively to the painted concrete as compared to rough concrete.
Installing a cement backer board over concrete would be unnecessary. Installing a cement product over a cement would be redundant. However, many tile installers prefer cement boards where the floor level needs to be raised. These boards are more difficult to screw into the concrete than plywood.
Installing concrete boards on concrete and then tiling over it is possible but will result in great amounts of effort and result in poor tiling. Cement boards are not as effective at uncoupling material as compared to an uncoupling membrane. Ditra and other uncoupling membranes are polyethylene-based, which are often used as waterproofing elements. These membranes are widely used by tiling professionals and can be trusted.
The biggest advantage of using an uncoupling membrane over concrete is that it unlocks tile from the concrete subfloor. It is flexible and does not copy the actions of concrete. Concrete can move and crack with time and transmits the same cracks to the tiles installed above it. Having an uncoupling membrane breaks this chain of transmission from concrete to the tiles and acts as a buffer layer.
Tiling on concrete with expansion joints, step by step
Installing a tile over an expansion joint transmits the slab’s movement into the tile, causing it to crack eventually. It would be best if you prevent any tiles from covering expansion joints while installing by incorporating them into your tiling pattern. Tiling on concrete with expansion joints requires carefulness.
Installing tiles on concrete requires allowances for the movement in the concrete surface due to temperature changes. Expansion joints are often not needed but are added to compensate for any expansion and contraction of the concrete. If the expansion joints would not be added, the seasonal expansion and contraction cause concrete to crack. The expansion joints decrease the stress over the material allowing the concrete to move in sections.
Here is a step-by-step guide on how to install tile over an expansion joint:
● Step 1: Clean the joint and take measurements:
The first step is to clean the expansion joint using a nylon brush to remove any dirt and debris. Use a pH-neutral cleanser to clean the concrete surface and rinse it with water. Allow the concrete surface to dry completely. Measure the joint’s length with a measuring tape and divide the length by half. Mark the surface with chalk at the center point along the joint.
● Step 2: Mix the thin-set:
Pour the thin-set into a large bucket and mix it with the help of an electric drill with a paddle drill bit attached to it.
● Step 3: Spread the thin-set over the surface:
Use a notched trowel to spread the mortar along the edges of the expansion joint. Keep the expansion joints free. Raise the ridges in the adhesive for a better grip by tilting the trowel onto its sides. Spread enough thin-set to install five tiles in a row.
● Step 4: Place the tiles:
Start with the tile centered on the chalk mark and install five tiles in a row. Use tile spacers on the tile edges to ensure equal separation. Continue placing tiles on the surface toward the edge of the area.
● Step 5: Remove excess thin-set:
Leave the joint clear by removing excess mortar from the joint with the edge of the trowel. Continue building onto the tile row and place spacers to separate new rows from the last. Ensure that you do not fill the expansion joints with thin-set.
● Step 6: Repeat the same process on the other side of the expansion joint:
Install the tiles in the same manner on the other side of the expansion joint, keeping the joint clear of all materials. Measure the space left on the edges and cut the partial tiles accordingly using a tile cutter and install them after applying the thin-set.
Tiling on a concrete wall, some helpful tips
If the wall is even, tiles can be installed directly on a concrete wall without the need for cement boards. Inspect the surface and smoothen it if needed.
The first step in tiling on a concrete wall is an inspection of the surface. It might have cracks or uneven areas on it. It would be best to check for moisture penetration on the concrete wall before tiling on it. If moisture is present on the surface, you must find tiles suitable for more wet areas. If there are no cracks or any other structural damage on the wall, you can proceed and start tiling.
If you find bumps, cracks, or dents on the surface of the wall, chip them away carefully with a hammer. Flush and fill the damaged areas with cement and use a flat piece of wood to make the surface level. Let the cement completely dry before advancing.
Apply a bonding agent to give a rough texture to the surface once the cement is dry. This will ensure that the tiles will stick better to the wall as the vertical tiles may slide as you work. Draw vertical and horizontal lines on the wall to serve as a guide when placing the tiles
While installing the tiles on a concrete wall, start from the bottom of the wall and work your way up. Use spacers between the tiles to space the tiles evenly for the grout. Use a notched trowel to spread the thinset on the wall. Use a rubber mallet to tap any tiles that are slightly raised. Let the tiles set overnight. Once dry, remove the spacers and apply the grout.
Tiling a wet room floor on concrete, some helpful tips:
Tiling a wet room floor requires the use of a primer to be applied before installation. A 100% layer of adhesive must be used when tiling wet rooms as well.
Tiling on a wet room floor on concrete is very popular as it gives a contemporary finish. It may seem like a straightforward task to lay tiles in a wet room, but in reality it is important to consider some points beforehand.It is important to consider which tiles are suitable for your wet room environment. For example, if there are linear drainage grills, large format tiles will work well. Similarly, for square drains, traditional mosaic tiles are best suited.
● Ceramic tiles
Ceramic tiles are made up of clay hardened by heat. These tiles have a polished glassed face which is of a different color from the ceramic underneath. Thus, these tiles are not suitable with frameless grills as the edge of the tile will be visible. These tiles can be used with stone-infill grills.
● Porcelain tiles
Porcelain tiles are more resilient than ceramic tiles, and they have a consistent color throughout. They can be used with both frameless and stone-infill grills. Similarly, natural stones like marble, granite, and slate also have a consistent color and can be used with both grill types.
● Mosaic tiles
Mosaic tiles are small tiles combined to form a complex pattern. They are not suitable for stone-infill or frameless grills because they are too small and shallow to match their height.
● Use a primer
A primer must be used before installing tiles in a wet room to remove any dust and debris present on the surface. Moreover, a 100% layer of adhesive without any addition of water must be used when tiling in wet rooms. This will act as a water-resistant barrier to protect beneath the tiles. The adhesive must be flexible and rapid set. There is always some movement in a floor under a wet room, a more flexible adhesive will help to compensate for those movements.
● Waterproofing and slipping
Before tiling a wet room, ensure that the waterproofing system has been installed correctly. To ensure tile cuts are kept at a minimum, plan where the drainage grill will be located at the start. Use slip resilient tiles to avoid slipping and use water-resistant grout and adhesive in the wet rooms.
Tiling on a new concrete floor, some helpful tips:
Wait at least 7 days before you begin to install tiles over a new concrete floor. New concrete contains a lot of water which needs to be retained while the cement is gaining its strength. Freshly poured concrete will also shrink as it dries. Ensure that the surface of the concrete is dry and clean prior to tiling. Use a flexible grout and adhesive to compensate for movement due to the shrinking of the concrete.
Water is needed by concrete in the start to gain strength. Cement needs to retain this moisture until the hydration process is complete. For this purpose, a polythene sheet is laid over new concrete to control evaporation and keep it moist. Concrete should be kept moist for at least seven days to gain sufficient strength.
Tiling on new concrete, while the material is still stabilizing can result in tiles moving from their base as the concrete shrinks below. To tolerate the movement caused by the shrinking of the concrete, you should use a flexible adhesive and grout.
Tiling over a concrete patch, follow these steps:
Ensure that the concrete patch does not have uneven areas and is free from cracks. If you notice cracks or other gaps, fill them first. Clean the surface and install the tiles over a dust-free surface.
The first step in tiling over a concrete patch is to clean the patch and rinse the floor. After cleaning, look for any cracks or uneven areas. Fill the cracks and remove the bumps with the help of a hammer. Also, fill any depressions on the surface. After surface preparation, apply the sealer. Use a membrane if the concrete patch is located in a wet area. After completing these steps, you can start to lay tiles on the concrete patch.
Tiling over cracks in a concrete slab, some helpful tips:
Tiling over cracks in concrete will cause the tiles to crack. The solutions to this problem are to either use a crack isolation membrane or a concrete filler. The most affordable option is to use a felt paper.
If you have wide cracks on the slab, you can bond the concrete together using high-strength epoxy, which can be injected into the cracks. A cost-effective option is to use felt paper. Apply a layer of thin-set adhesive and cover it with the first layer of felt paper. Smooth the felt paper with a roller and install the second layer of felt paper over the top.
Tiling over linoleum glue on concrete, some helpful tips:
Adhesives like linoleum glue often get attached to the substrate after the old floor is removed. Remove all the traces of linoleum glue to provide an ideal surface to install the new tiles.
To remove the linoleum glue, you will need a floor scraper. The key is to hold the tool at a suitable angle while scraping. Once you have found an angle that works best, stick to it and work in small sections. Use the blade edges to remove small strips of material.
Chemicals can also be used to remove old adhesives like linoleum glue. These adhesives soften the tough linoleum glue and make it easy to remove. Follow the manufacturer’s instructions while using these chemicals.
Tiling over painted concrete, some helpful tips:
In general, tile should not be attached directly to painted concrete. Due to the paint, the thin-set will not bound correctly to the paint and can lead to cracks.
Before starting to lay tile, remove the paint with sandblasting or another method. Ensure that the concrete is even and correctly level and has no cracks. In that case, you can lay tile on the concrete directly. If not, add self-leveling concrete or a membrane such as Ditra.