Screed and Tiling: 9 Things You Should Know
Screed is a material that is often used as a finishing layer on an underfloor to level it before laying tiles. Tiles are a nice addition to your flooring, as they can provide a protective element against moisture and make an attractive and comfortable combination to your home. Tiling on screed is becoming more common, and with the right tips and tools, you can do it yourself. Here are the nine things you should know about screed and tiling.

Contents
- 1 Moisture Content Screed Before Tiling, some helpful tips:
- 2 Priming Screed Before Tiling, some helpful tips:
- 3 Sand and Cement Screed for Tiling, some helpful tips:
- 4 Screed Drying Time Before Tiling, some helpful tips:
- 5 Screeding Floor Before Tiling, some helpful tips:
- 6 Sealing Screed Before Tiling, some helpful tips:
- 7 How to Screed a Floor for Tiling, some helpful tips:
- 8 Tiling on a New Screed Floor, some helpful tips:
- 9 Tiling on Underfloor Heating Screed, some helpful tips:
Moisture Content Screed Before Tiling, some helpful tips:
In general, it’s advisable to test the screed moisture content before tiling. This can be done with a sealed hydrometer. Traditional cement-based subfloors and calcium sulfate screed should be 75% RH or less.
To test the moisture content, use an accurate hydrometer. Place the hydrometer on the screed and create a sealed area around it with clear plastic and duct tape. This way, the hydrometer will measure the moisture content from the screed and not from the air in the room. Leave the hydrometer for around 72 hours and check the value before removing the plastic and duct tape.
Priming Screed Before Tiling, some helpful tips:
In order to effectively prepare the screed surface for tiling, certain techniques should be followed. After spreading the screed on the surface, wait until it dries, then seal the surface using a good quality acrylic primer. Make sure to prime the floor twice, in such a way that both coats are laid at 90 degrees to each other. Mix one part of the primer with two parts of water to properly soak into the screed surface. If the mixture is too thick, instead of absorbing into the screed, it will just sit on the top of the screed.
Priming screed before tiling is an absolutely necessary step because of the liquid nature of screed. It self-levels after it’s spread o to the surface. But tiling directly over this screed isn’t recommended without priming the surface because the screed and adhesive can undergo a chemical reaction when they come in direct contact with each other; thus, loosening the bond between them and resulting in the separation of adhesive from the screed and damage to the tiles.
You can use several primers to seal the screed for tiling according to your budget. For a cost-effective solution, you can use a readily available standard SBR primer. Or go for a premium product like Kerakoll Primer A, which is primarily for priming screed. PVA isn’t suitable to prime the screed surfaces because it won’t bond strongly with the adhesive, causing your tiles to peel up.
Sand and Cement Screed for Tiling, some helpful tips:
In general, the mixing ratio of sand and cement screed depends upon the floor area on which you are planning to tile. To separate the screed from the floor, lay the PVC sheets on the floor, overlapping the sides of the sheets with each other using tape. Prepare the screed by mixing the correct amount of sand with water and use a trowel to spread it onto the surface. Make equal quadrants and put the batten between the two quadrants. After spreading enough screed on the floor surface, level the screed using the straight edge, remove the batten and fill in the gaps.
For the floor tiling, it’s necessary to pay full attention to the correct preparation and installation of tiles because floor tiles experience foot traffic that can damage the structural integrity of tiles. The adhesive must maintain a strong bond between the tiles and the surface. Sand and cement screed can be laid over the floor surface before laying tiles to ensure this. This technique comes in handy against extra movement and deflections that can be caused by moisture.
Installing screed over concrete floor provides a smooth and strong surface for tile installation, protecting the surface from moisture and other issues. Begin your project by cleaning the concrete surface so that the screed can settle on the floor perfectly.
After spreading the screed over the floor surface, please wait until it dries completely. Repair all the cracks and remove any weak screed from the surface. When laying tiles, make sure that movement joints are not covered since they allow subfloor movement. Level the uneven screed using the ULTRA self-leveling compound. Before placing tiles, the substrate should be fully dry to make your tiling effective.
Screed Drying Time Before Tiling, some helpful tips:
In general, screed needs 3 to 7 days to dry such that you can lay tile on it. The exact drying time will depend on the mixture and the environmental conditions. A well-ventilated environment, a higher temperature, and low humidity will improve the drying time.
The drying time of the screed varies with temperature and other conditions. But generally, the screed takes approximately 48 hours to dry, so avoid any traffic on the screed surface during that time. Then you can walk on the screed and open the windows to allow evaporation to take place. The outside temperature, ambient humidity, and air also affect the drying time of the screed.
Certain factors affect the drying time of the screed, and by controlling these factors, you can speed up your drying process.
● Factor 1: Ventilated Environment
Create a ventilated and warm environment for the screed to dry as quickly as possible. The maximum time screed takes to be completely cured in 28 days. However, it’s possible to reduce this time, depending on other conditions. If you are planning to move heavy furniture over the floor on which you are tiling, or there will be a lot of foot traffic, then it’s recommended you wait at least 4-5 days before laying tiles.
● Factor 2: Temperature and Humidity
The most crucial factor that affects the drying time of screed is temperature and humidity. The higher the outside temperature, the less time screed will take to dry. Similarly, if you are tiling in an area where screed is exposed to unusual moisture, this slows down the drying process. The ideal drying temperature for the screed is 20 degrees, with a humidity level of 60%. You can also decrease the drying time of the screed using the underfloor heating system if you have one.
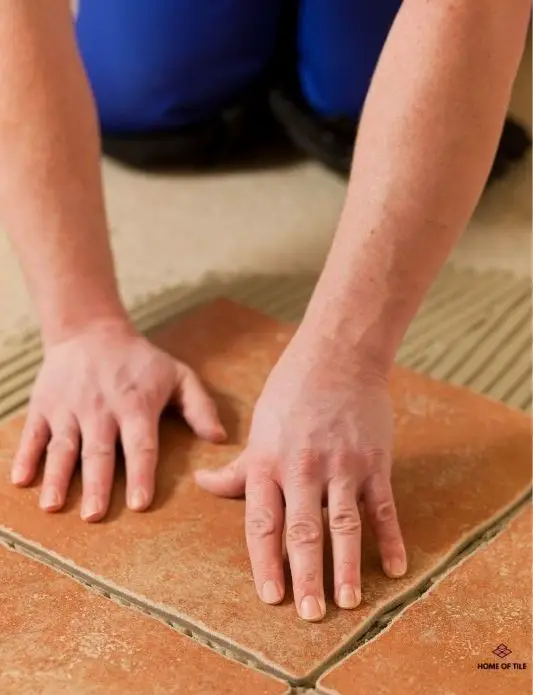
Screeding Floor Before Tiling, some helpful tips:
In general, to screed your floor, you should ensure that you are using the correct type of screed suitable for your floor surface. You can use traditional sand and cement screed for most floors. Liquid screed, also known as self-leveling, can be used in uneven areas or exposed to high temperatures. Anhydrite screeds aren’t suitable for the areas that are most likely to get wet. If you have a limited time and want to complete your tiling as quickly as possible, you should go for a fast-drying screed, such as FlexiDry. These types of screeds allow for tiling just 3 days after installation.
Three methods can be used for mixing screed properly. If you are tiling a small area, then follow the hand mixing procedure, but the work is strenuous, and the estimated quantities and manual errors while mixing can seriously affect the quality of the screed. Therefore, the most efficient method recommended by the experts in the use of screed pumps and pan mixers. Similarly, pre-mixed screeds are also available on the market. After preparing the screed, spread it over the floor surface in an even manner and ensure that no dry joints are left. Then, level the screed using the flat edge of the trowel and wait for it to dry.
Before laying tiles on the floor, it’s necessary to screed over it to ensure that floor is leveled and even. Especially in the presence of moisture, an uneven floor causes cracks and leads to uneven tiles joints. When you screed a floor, it provides the final base for the floor tiles, ensuring the tiles’ quality, finishing, and durability.
Sealing Screed Before Tiling, some helpful tips:
In general, elastomeric and crack-prevention membranes are the best sealing mortars to seal concrete floors because concrete expands differently from the thin-set mortar. These sealing membranes block the moisture from getting into the concrete, which could cause movement and deflections. The sealants act as a water barrier that helps the adhesive maintain its bond between the tiles and the surface.
It’s essential to seal the screed floor before laying tile. This prevents it from affecting the tiles. Tiles contract and expands when moisture goes through the concrete. Higher moisture produces larger spacing between the concrete aggregates, decreasing the strength and durability. Under lack of air circulation, humidity reaches the concrete floor, and the PH level and the temperature of the concrete increase. This affects the thin-set ability to maintain its bond between the tiles and the surface.
How to Screed a Floor for Tiling, some helpful tips:
In general, prepare the floor surface by filling any holes and cracks with a trowel. Clean any dust and debris from the floor and remove any grease or oil stains using a detergent. Remove any skirting boards. Mix the screed compound according to the manual instructions. The mixing screed sets quickly, so if you cover a larger area, prepare the substrate in steps. Spread the screed over the floor, starting from the corner opposite the door. Spread screed evenly over the floor and level it using the trowel. Leave the floor to dry before tiling over it completely.
Tiling on a New Screed Floor, some helpful tips:
In general, tiling directly on a new screed floor is quite dangerous. Tile adhesives undergo a chemical reaction when they contact each other, affecting the grip between the tiles and surface. It is essential to prime the surface to separate the screed from the adhesive. Screed usually takes around 7 to 28 days to dry, depending on the mixture type and environmental conditions. Wait for the screed to dry entirely and test the moisture content before moving to the next step.
Tiling on Underfloor Heating Screed, some helpful tips:
In general, for tiling on underfloor heating, the screed thickness should be according to the given instructions. If you have a hand-mixed screed, the minimum thickness should be 2.5 inches, and for the liquid screed it should be 1.9 inches.
Transfer of heat to the room by the underfloor heating system depends upon the thermal conductivity of the screed you are using. Screed contains a lot of moisture. This is why it takes almost a week to dry completely. You can carefully use the underfloor heating system to speed up this process. Never turn on the underfloor heating system at full power the first time. Start at the lowest temperature and slowly increase it in the following days. You can also utilize your room thermostat if you have more heating sources to allow the screed to dry quicker.