Tiling and Plaster: 10 things you should know
Using plaster if you plan to tile a wall is an excellent option because it offers many advantages instead of drywall. In older houses, you would most likely see plaster as the wall covering because plaster offers resistance against noise and fire.
Throughout this article, you will learn how to tile over a plaster surface and how you should install plaster on a wall’s surface to prepare it for tiling. You will also learn certain necessary precautions that you will need to follow for tiling on plasterboard.

Contents
- 1 Tiling over plaster, some helpful tips:
- 2 Tiling a plastered wall, some helpful tips:
- 3 Do you plaster before tiling? Some helpful tips:
- 4 Plastering a wall for tiling, some helpful tips:
- 5 Priming plaster before tiling, some helpful tips:
- 6 Tiling on damp plaster, some helpful tips:
- 7 Tiling on new plaster, some helpful tips:
- 8 Tiling on old plaster, some helpful tips:
- 9 Tiling on plaster skim, some helpful tips:
Tiling over plaster, some helpful tips:
In general, the first step for tiling over plaster surfaces is to test the surface to ensure it can bear the weight of the tiles. Prepare the surface and get rid of any loose plaster or wallpapers and repair any areas that need patching.
Applying plaster before tiling is becoming increasingly popular because of its durability and strength. Installing plaster over the surface prepares it for laying tiles more efficiently and effectively. To tile over the plaster surface successfully, you need to follow the steps mentioned below.
● Step 1: Testing the surface
Before installing tiles on the plaster surface, you need to test if the plaster surface will support the tiles properly. For this purpose, gently apply pressure on the plaster surface to see if the surface could crumble. The maximum weight skimmed plaster can bear is 4.1 psi, so make sure that the tiles you choose are a suitable choice and will be able to maintain their grip over time.
● Step 2: Prepare the surface
To prepare for tiling, firstly, remove any loose paint and wallpaper from the surface. Also, scrub the surface with sandpaper to allow for a strong grip on the adhesive. Mark any cracked plaster on the surface and patch them with fresh material. Let any fresh plaster dry, and then begin tiling. Freshly applied plaster usually takes 4 weeks to dry.
If the plaster on the surface is old, make sure there is no loose plaster or cracks on the surface, and then you can start your tiling project. If you are tiling in wet conditions where moisture can affect your tiles, then seal the plaster with PVA before tiling.
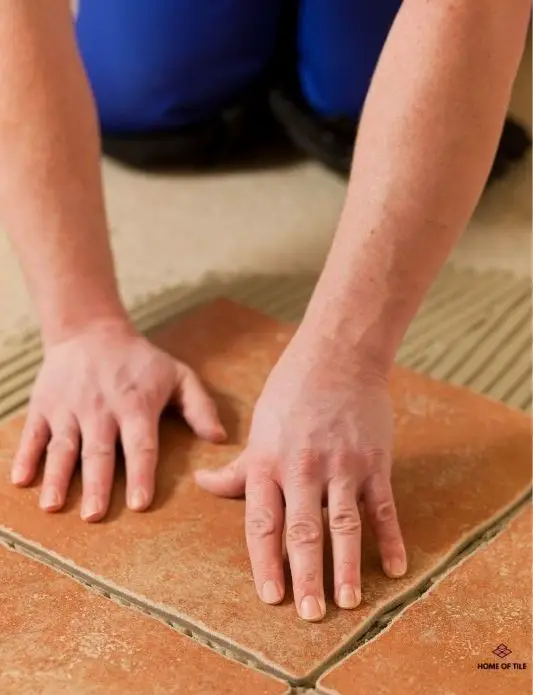
● Step 3: Install the tiles
Your surface is now ready for tiling. The first step in tiling is to prepare the thin-set. Carefully mix the thin-set according to the instructions. The thin-set usually takes 30 to 40 minutes until it hardens and is ready to use. After the thin-set is prepared, apply it on the back of the tile and the targeted area and push the tile on the wall. Move the tile back and forth a bit to ensure that it settles. After placing the first tile, pull it back using a trowel and check the back of the tile. If there is still 80-90 % of thin-set coverage on the back of the tile, then your thin-set is ready. Otherwise, mix more thin-set to make it hard enough so that it can hold the tiles still.
Repeat the procedure and complete the whole row. When placing the tiles, it is important to maintain an equal distance between all the tiles. For this purpose, you can use plastic spacers. Sometimes, at the corners or at the end of the row, the general tile size cannot be fitted, so it will need to be cut accordingly. Taping tiles with the painter’s tape is also recommended until the thin-set settles the tiles.
The spacers that are placed between the tiles should be able to be removed after the thin-set dries. So you should be very careful when placing the spacers between the tiles and make sure to clean any excessive amount of thin-set from the tiles and in between the tiles. It is easier to clean the thin-set when it’s wet, so be sure to clean the thin-set from the floor or wall where there is no tile at the end of the day because after drying, it will become the part of the surface and will make an uneven or bumpy surface.
● Step 4: Let the thin-set dry
The thin-set usually takes 24 hours to dry, be sure to avoid putting any pressure on the tiles during this time. After 24 hours, remove the plastic spacers and painter’s tape from the tiles. Now it’s time to use grout. Prepare the grout according to the manufacturer’s instructions if your grout is not already premixed. After applying the grout between the tiles, wait for an hour to dry the grout. Clean the front surface with a sponge or mop.
Tiling a plastered wall, some helpful tips:
In general, the first step when tiling over a plastered wall is to examine the surface and prepare it for tiling. If you are tiling over the freshly applied plaster, wait until the plaster is completely dry before you begin. Seal the plaster surface to protect against any moisture and humidity.
● Step 1: Examine the plaster and prepare the surface
Begin your tiling project by examining the surface and look for any old fittings that need to be removed. Remove any screws, nails, and loose plaster from the surface. Repair any cracked plaster and mark all uneven spots. Then, level the surface and make sure to wipe away any dust or debris.
● Step 2: Seal the plaster
Before installing tiles on a plastered wall, ensure that the plaster is completely dry. Tiling over damp plaster causes the tiles to eventually fall because plaster does not become strong enough to adhere to the tiles until it is completely dry.
Similarly, if you are tiling in damp conditions where there is a risk of moisture affecting the tiles’ durability, it is necessary to seal the plastered wall before tiling it. If the surface under the tiles contract and expand when moisture is present, it can affect the tiles ability to keep safely attached. As the moisture level increases, it creates larger spacing between the plaster, decreasing its strength and durability. Also, under the lack of air circulation, humidity reaches the plastered wall, and the PH level and the temperature of the plaster increase. This affects the strength of the thin-set that is used to hold the tiles.
● Step 3: Tile the plaster
Wait for the sealer to dry, and then you can start laying tiles on the surface. Prepare the adhesive and spread it over the surface using the trowel. Level the adhesive on the wall surface and fix the first tile at the starting point. Push the tile onto the surface and move it a little back and forth to settle correctly. Repeat the same process row by row to complete the wall.
Do you plaster before tiling? Some helpful tips:
In general, it is not essential to plaster your surface before tiling. But plastering the wall before installing tiles provides many advantages and is recommended by many experts.
Plastering a wall before tiling provides you with a smooth surface to lay tiles. Compared to a cemented surface, plastered surfaces have an edge when fixing tiles over it. And in most cases, laying tiles over the plasterboard saves you from preparing or priming the surface.
An alternative could be to fix tiles on the surface using Razon TileFix A1. In that case there is no need to plaster the wall surface before tiling. Using this adhesive eliminates the risk of not using the plaster, and it provides a strong enough bond between the tiles and the wall.
Plastering a wall for tiling, some helpful tips:
Prepare the plaster by adding water, mixing it until it is ready to apply onto the surface. Spread the plaster on the wall with the help of a trowel and level it. Wait until the plaster dries and patch any areas with plaster that needs improvement.
To plaster the wall for tiling, you need to prepare the surface by removing any loose wallpaper, plaster, nails, and screws. Then use a wet sponge to clear dust and debris from the wall. Let the wall dry and sand the wall with sandpaper or a brush so that the plaster can adhere properly. Next, prepare the PVA solution by mixing glue and water to fix anything loose into place. Apply it to the wall and then wait until it dries.
Priming plaster before tiling, some helpful tips:
In general, you can prime plaster by using either a BAL primer or PVA glue for tiling. Mix the PVA glue with water and mix it until it dissolves with water. Apply the first coat of PVA solution onto the plaster surface and wait 15 minutes. After 15 minutes, apply the second coat and wait for 24 hours to dry completely. This will seal the plaster, preventing any moisture from the adhesive from being absorbed by the plaster surface.
Priming the plaster before tiling over it is highly recommended because plaster is highly porous, which means that it absorbs moisture. This will affect the thin-set’s adhesion property, thus affecting the grip and bond between the tiles and wall surface.
Tiling on damp plaster, some helpful tips:
In general, tiling on damp plaster is not recommended. It greatly increases the risk tiles will fall off. Whether you apply fresh plaster to cover some patches or plaster over a whole area, be sure to let it dry completely before beginning. Otherwise, the moisture will not be able to evaporate and will be blocked by tiles.
After applying plaster on the surface of a wall, wait at least 7 days and examine the surface again to see if the wall is dry. If the plaster is completely dry, you can move towards tiling. Otherwise, let the plaster continue to dry.
Tiling on new plaster, some helpful tips:
New plaster should be allowed to dry entirely before fixing tiles over it. The drying time of plaster depends upon the environmental condition and varies according to temperature changes. Usually, the average time plaster takes to dry is around 2 weeks. But it can take up to 4 weeks before being fully cured.
Plaster is not the ideal surface for tiling in bathroom or wet areas because it is highly affected by moisture.
Tiling on old plaster, some helpful tips:
In general, you can tile on an old plaster surface without preparing it if the surface is completely even and smooth. Otherwise, prepare the surface first to tile over it. Mark uneven spots and level them. Patch any areas with plaster that need improvement and let those patches dry completely before starting to tile.
Tiling on plaster skim, some helpful tips:
In general, the maximum weight skimmed plaster can tolerate is 4.1 psi. Be sure to choose tiles where the weight is suitable for the plaster, so they will be able to maintain their grip over time. In some cases, you have to choose more lightweight tiles as 4.1 psi includes the weight of the adhesive and grout. Prime the skim plaster with a BAL primer to prevent it from absorbing moisture from the thin-set.