Removing Before Tiling: 8 Things You Should Know
When you want to tile a wall or floor, it is important to check how the surface looks. A fairly sound surface is needed for good results. If the surface is not even, it will make a straight result almost impossible. This article will dive into different situations you might encounter when planning to tile a wall or floor.
Contents
- 1 Preparing a Wall for Tiling After Removing Old Tiles
- 2 Do You Have to Remove Thin-set Before Tiling?
- 3 Is it Necessary to Remove Wallpaper Before Tiling?
- 4 Do I Have to Remove Linoleum Flue Before Tiling?
- 5 Do I Need to Remove Vinyl Floor Before Tiling?
- 6 Removing Floor Boards for Tiling
- 7 Removing Tiles and Re-tiling
- 8 Should You Remove Old Tiles Before Tiling?
- 9 Preparing Textured or Painted Wall for Tiling
Preparing a Wall for Tiling After Removing Old Tiles
Removing old tiles is a laborious task. The first thing to do after removing old tiles is to assess the condition of the wall. You must look for any cracks and holes in the wall and fill them before proceeding. Holes that are 6-8 inches or less can be filled using a patch kit. If you find anything larger than that on your wall, you will need a piece of drywall.
Apply joint compound over the holes in the wall. Put the joint compound on a trowel and apply it evenly on the wall with horizontal strokes. The joint compound will fill any holes or cracks and level out the wall for new tiles. Once the first coat is completely dry and sanded, you may need to apply another light skim coat.
Once the holes are filled, and the skim coat has dried completely, you must start sanding. Do not forget to wear safety glasses and a mask before sanding. Sand the wall to level and smooth it out. Once you are satisfied with the sanding results, remove as much dust from the wall as possible. Using a vacuum will make this job much more manageable. Once the dust is cleaned, wipe down the wall with a damp microfiber cloth. After all these steps, your wall is well prepared for the new tiles.
Do You Have to Remove Thin-set Before Tiling?
You always need a smooth and level surface to install tiles. Removing old tiles often leaves behind debris and old thin-set. You can apply a new thin-set over the old, only if the old thin-set is perfectly smooth and level.
Tiling over the old thin-set may affect the longevity and durability of the new tiles, as the old thin-set is not perfectly smooth and level. The newly installed tiles will always be prone to damage and may fall off eventually.
It’s recommended to prepare the old thin-set for tiling first, then apply the new thin-set over the top. The best way is to smooth out the old by grinding it down. Use a floor grinder. Pass the floor grinder back and forth over the old thin-set until it becomes smooth and even. Once the old surface is level, you can apply a new thin-set and start tiling.
You may use a self-leveling compound to smooth out old thin-set if you only have a small amount to remove. Self-leveling compounds create a flat surface, ideal for tiling after hardening. Always remember to scrape up any loose thin-set first before applying a self-leveling compound.
You can also use a cement backer board over the old thin-set to level the surface on the floor. This applies in the case where the old thin-set is highly uneven. The backer board is screwed to the subfloor with a thin layer of thin-set for support. You must remove the highest levels of old thin-set and then install backer board over it. Make sure that the Becker board is water-resistant if you are installing it in the bathroom or kitchen.
Is it Necessary to Remove Wallpaper Before Tiling?
Tiles offer more longevity and durability than wallpapers. It’s the best option to remove any old wallpaper before tiling it by wetting it with a sponge, then using a wallpaper scraper or a putty knife to remove the wallpaper from the wall.
There is an overwhelming consensus from tiling companies and home decorating centers that you should not tile over wallpaper. Tiling over the wallpaper can be problematic because you are risking your expensive and hard tiling job over a surface of the wall, which may not hold the tiles in the long run.
If you want the longevity and durability of the tiles you are installing, you must put your effort into removing the wallpaper first and properly prepare the wall for tiling. People also use steamers to remove wallpaper, but most experts don’t recommend steamers for this purpose. The reason is that steamers can force steam deeper into the drywall, which may cause adhesion issues.
After applying the warm water over the wallpaper, start pushing the putty knife from the edges, and once you get hold of the wallpaper sheet, you can start pulling it with your hand. After removing the wallpaper, let the wall dry. Once it is dry, sand the wall using sandpaper and create a rough surface on the wall.
Do I Have to Remove Linoleum Flue Before Tiling?
Adhesives like linoleum glue often get attached to the substrate after the old floors are removed. To provide an ideal surface to install the new tile, it’s recommended to remove all the traces of linoleum glue.
It would be best if you use a floor scraper to remove old linoleum glue. The key is to hold the tool at a suitable angle while scraping. Once you have found an angle that works best, stick to it and work in small sections, using the blade edges to remove small strips of material.
Chemicals can also be used to remove old adhesives like linoleum glue. These adhesives soften the tough linoleum glue and make it easy to remove. Follow the manufacturer’s instructions while using these chemicals.
Do I Need to Remove Vinyl Floor Before Tiling?
You can tile over the vinyl floor if it’s glued firmly and was installed over cement. Tiling over a vinyl floor requires an evaluation of your floor first. Fill any tears in the floor before installing new tiles.
Vinyl and linoleum floors may contain asbestos. If this is the case, you must get these materials removed entirely by professionals. Unfortunately, you cannot sand vinyl or linoleum floors with asbestos due to the harm it can cause. Certain types of vinyl floors make poor underlayment for tiles because these floors may shift over time and become unstable. Floors like perimeter bond sheet vinyl or vinyl with a cushioned structure fall into this category.
Luxury vinyl planks are also not suitable for new tile installation. These planks are installed without any adhesive in a floating fashion. If you install tiles on these types of surfaces, the floor under your tile may shift over time, creating cracks in the grout.
While installing the tiles on the vinyl floor, first sand the floor. After sanding, clean the floor thoroughly with a cleaner. Install a suitable backer board for your tile. 1/4-inch-thick cement backer boards are ideal for tile installation. Apply thin-set to adhere the backer boards to the floor and lay the backer boards, and make sure that you leave a 1/4-inch gap between the boards and around the walls. Before installing the tiles, make sure that the adhesive under the backer board is completely dry.
Removing Floor Boards for Tiling
If your floorboards are damaged or rotten, you must remove them before tiling. If floorboards are new, you may install backer board and tile on them.
Damaged floorboards do not provide a rigid and flat surface for the installation of the backer board. Installing new tiles over damaged floorboards may cause problems in the future. Therefore, you must remove old floorboards before preparing for tiling.
Before removing floorboards, determine what to do with the wood. If you have no intention of preserving the wood, you can remove the floorboards yourself. However, if you want to preserve the wood for some other purpose, enlist the help of a professional.
Here are the steps to remove floorboards for tiling:
- Step 1: Cut down the length of one board with a circular saw.
- Step 2: Slip the pry bar under the cut board and lift both halves of the board up.
- Step 3: If you don’t want to preserve the floorboards, cut each board into smaller sections.
- Step 4: Pull up each board individually.
- Step 5: Use a pry bar to lift the board you intend to remove next.
- Step 6: Once the edge of the board lifts up, slide the pry bar to the next nail.
- Step 7: Use a mallet for boards that are difficult to remove.
Removing Tiles and Re-tiling
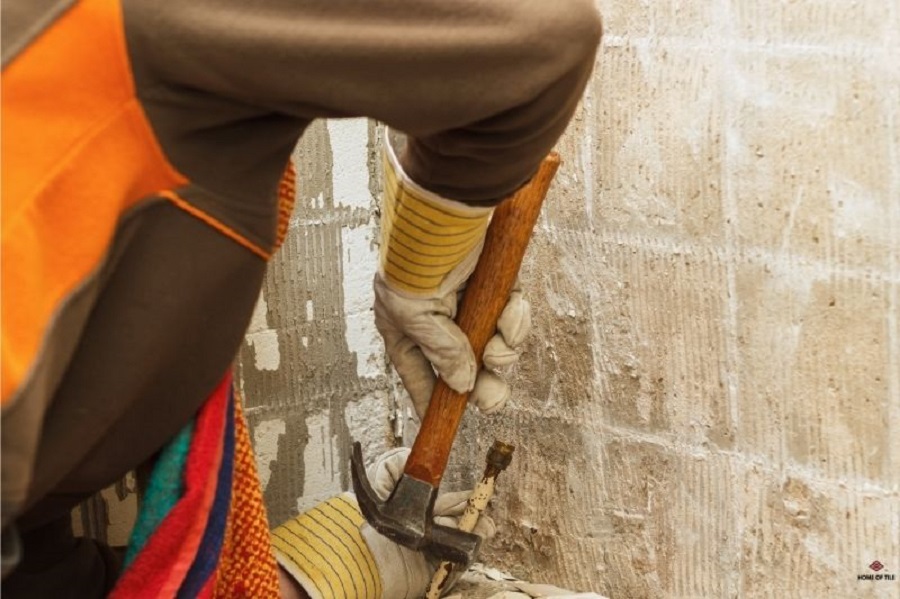
It’s preferable to remove old tiles before installing new ones. Remove old tiles with the help of a chisel. Once the old tiles are removed, prepare the wall or floor for new tiles and apply the new ones.
Removing old tiles is a challenging and time-consuming task. The first step is to remove any fixtures and empty the room. Create a starting point by breaking a tile with a hammer and a chisel. Tiles may come up easily or require effort depending on the mortar and the type of underlayment used. Continue to pry up the tiles and collect the tile pieces to minimize the clutter.
Once the tiles are removed, the next step is to assess the underlayment. In some cases, the tiles are directly attached to the concrete floor, but if the tiles were attached to plywood, checking the underlayment is necessary before re-tiling. Damaged underlayment must be removed in order to tile properly.
Clean the floor with the help of a shop vac and remove any debris or dust. If you have removed the underlayment, remember to remove or pound exposed nails. Fill any cracks or holes in the floor with a joint compound. Once the compound is dry, apply the thin-set and install new tiles.
Should You Remove Old Tiles Before Tiling?
To tile on an already tiled wall, you need to create a rough surface for the adhesive to bond well. You can use a grinding disc or a chisel for this purpose.
If you have an already tiled wall, there are two choices. You can either remove the old tiles or prepare the wall to tile over the old tiles. Most tiles are too smooth for the adhesive to hold properly; therefore, you need to create a rough surface for the adhesive to bond properly. You can use a hammer and a chisel to create a rough surface. This can be quite laborious if the wall is large; therefore, you can use a grinding disk to create arbitrary lines on the wall.
It’s also important to check for hollow tiles before installing new tiles, knocking each tile, and listening for hollow sounds. The hollow tiles must be removed, and the vacant space must be filled before installing new tiles. If the old tiles are too much damaged, then they must be removed.
If you want to use the old tiles again, be careful while removing them, paving the floor to place, and protect them.
Preparing Textured or Painted Wall for Tiling
In general, to tile on a painted or textured wall, remove the peeling paint by scraping the wall. Create diagonal lines on the painted wall by using the edge of the scraper. This will make the scraping of paint easier. Fill all the cracks and holes in the wall. Then fix the uneven areas in the wall with sandpaper. Remove as much paint as you can before tiling the wall.
Move the wide area of the scraper over the painted wall to remove as much paint as you can. After removing the paint with a scraper, you can use a paint remover to remove any other paint left on the wall. After the removal of paint, use medium-grade sandpaper for sanding the wall and creating a rough surface for the adhesive to bond properly.
Ensure the wall is dry and there are no heavy particles present on the wall using a vacuum. Use an ammonia-based cleaner or tri-sodium phosphate to remove any remaining dust, grease, and oils from the wall, ready for tiling.