Tiling on Wood and Timber: 10 Things You Should Know
Many people using the tiles because they provide a cleaner and more furnished look to their floor or wall. Tiles also provide more rigidity and longevity compared to wooden floors. However, installing tiles on wood is not as simple as installing tiles over concrete. Concrete floors are rigid and require less preparation, whereas wood and timber floors require appropriate preparation before tiles can be installed over them.
Tiles need a rigid surface underneath prior to installation. Wooden floors don’t provide the required rigidity because wood bends, expands, and contracts with temperature variations and humidity. This article will teach you about tile installation over wood and timber and the appropriate preparation needed.

Contents
- 1 Tiling on wood, some helpful tips:
- 2 Floor Tiling on Chipboard, some helpful tips:
- 3 Floor Tiling on Wooden Floors, some helpful tips:
- 4 Floor Tiling on Wooden Floorboards, some helpful tips:
- 5 How to Seal Wooden Floors Before Tiling, some helpful tips:
- 6 Tiling on Timber, some helpful tips:
- 7 Tiling on Suspended Timber Floors, some helpful tips:
- 8 Tiling on Timber Floors, some helpful tips:
- 9 Tiling Over Timber Floor in a Bathroom, some helpful tips:
- 10 Water-Resistant Tiling Boards, some helpful tips:
Tiling on wood, some helpful tips:
In general, tiles can be installed on a wooden subfloor as long as it is rigid enough and flexible tile adhesive is used. It is not advised to lay tiles directly on timber and groove floorboards, they are subject to movements and deflections. In that case, the rigidity of the subfloor has to be increased using a backer board or plywood. It is possible to tile directly onto tongue and groove wooden floorboards, but it will require an ultra-flexible and rapid thin-set.
A wooden floor bends, expand, and bounces naturally. If the tiles are not installed correctly on such a floor, they may end up cracking. Rotten or imperfect wood will also increase the chance of cracking significantly.
● Flexible adhesive:
When a load is applied to a wooden floor, it will deflect more or less depending on the structure’s stiffness. To absorb this floor movement, a thick layer of flexible adhesive must be used. Else, the tiles may crack or delaminate.
● Wooden floor Localized movement
In some locations, there can be localized movement in the floor due to unsupported board joints. Joints must be supported by joists, noggings, or the tongue of each board beneath.
● Wooden floor expansion due to temperature changes
The wood expands and contracts when there is a change in temperature. Expansion and contraction rates of wood due to temperature variations are different compared to thin-set, ceramics, and natural stones. This expansion and contraction of the wood due to temperature change can end up raising the floor height at some points, making the floor uneven. Manufacture boards, such as plywood don’t expand or contract with temperature changes. However, timber expands much more across the grain than it does along the grain.
● Wooden floor expansion due to moisture
Another problem that arises in wooden floors is the expansion or contraction due to humidity and moisture. Wood swells when it gets wet; therefore, changes in atmospheric humidity may also cause wood to expand and swell. This also raises the floor in some areas and affects the rigidity of the wooden subfloor under the tiles. Mostly this problem arises in wet areas, like showers and kitchens. Applying a membrane or coating can help in some cases.
Floor Tiling on Chipboard, some helpful tips:
In general, tiling directly on chipboard is not advised. Chipboard gets damaged when it makes contact with water. Tiles also need a rigid surface for installation. If you have thinner chipboards installed in your house, tiling isn’t an option. These chipboards cannot bear the amount of weight that tiles will put on them.
Thick chipboards can be prepared for tiling by installing an uncoupling membrane or backer board. Both of these products isolate the chipboard floor from the tiles, while also adding to the rigidity of the floor. More information about the preparation of chipboard or wooden floor is given in the next sections.
Floor Tiling on Wooden Floors, some helpful tips:
In general, wood is not the most suitable subfloor for tiling. If tiling on wood is desired, the wooden floor needs to be prepared correctly. Wood naturally shrinks, swells, twists, and wraps due to a change in temperature or humidity. The movement in the wooden subfloor causes the tiles to crack and even break.
Use the following tips for tiling on a wooden floor:
● Tip 1: Fix and clean the floor
Start by checking for loose or damaged floorboards and fix them. Clean the floor after fixing the loose floorboards.
● Tip 2: Add plywood or backer board
You can install a backer board or plywood to prepare the wooden floor for tiling. Backerboard is screwed down using backer board screws, and an adhesive is also applied to stick to ensure it’s well adhered to the wooden floor underneath.
● Tip 3: Use a membrane
You may also use an uncoupling membrane over a wooden floor. This membrane provides an isolation barrier between the wooden floor and the tiling substrate and prevents moisture from affecting the wooden subfloor.
Floor Tiling on Wooden Floorboards, some helpful tips:
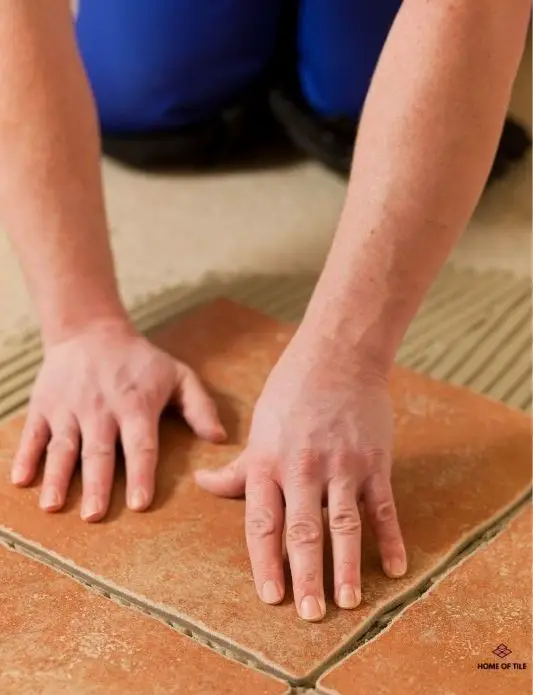
In general, tiles can be laid on wooden floorboards. But you must ensure that the floor can handle the weight of the tiles. Fix loose floorboards and cracks. Use a backer board or plywood to prepare your surface for tiling. Use a primer on the surface of the backer board before starting to lay tile.
Most people think that tiling over floorboards is complex. However, this isn’t the case as long as you follow some basic steps:
● Step 1: Inspect the surface and fix loose floorboards
Wooden floorboards are prone to squeaks and creaks. The loose floorboards must be fixed before laying tiles. Take all the furniture out of the room and walk on the floor to check the loose floorboards. Mark the defective boards and use short countersunk screws to fix them in place. After fixing the loose boards, clean the surface.
● Step 2: Prepare the wooden floor for tiling
Tiles always need a rigid underlayment. To create a smooth and rigid surface, use a backer board or plywood. Backer boards are thin and a more popular choice than plywood, which is relatively thick and raises the overall height of the floor. Screw down the backer board or plywood to the floor and use an instant adhesive to attach them to the floor.
● Step 3: Prime the surface
To create a good surface for laying tiles, use a primer. If you’re using plywood, you can use SBR or an acrylic primer. If you’re using a backer board, SBR is the best primer to prime the surface. Avoid using PVA primers, as they may damage the surface of the board. Once the surface is primed, you can apply the thin-set and lay the tiles.
How to Seal Wooden Floors Before Tiling, some helpful tips:
In general, seal wooden floors before tiling to avoid moisture problems. Over time, moisture can cause unnoticed damage to the timber. Most manufacturers and professionals recommend using a primer on a wooden floor before tiling. Coat it with SBR (Styrene Butadiene Rubber) or PVA (Polyvinyl Acetate).
Sealing materials come in a spray-on or paint-on variations. These materials are liquid latex that is applied over the wooden floor. When the material dries, it creates a protective layer, protecting the wooden floor against moisture. Primers are also used to reduce the substrate’s porosity and minimize the risk of a chemical reaction with adhesives.
PVA can be used to seal the wood to give it a waterproof quality. PVA can also be used as a primer to give extra adhesion. It’s a high-performance bonding agent, primer, and dust proofer as well. PVA is water-soluble, and you can add water to the glue to make it thinner. Make sure you don’t over dilute it. Pour a small amount of water and stir it well before application. You should apply at least three coats of undiluted PVA to seal the floor. Allow each coat to dry completely before applying the next one.
SBR can also be used to seal wooden floors before tiling. SBR is a bonding agent, but it can also be used as a primer and sealer to improve adhesion between successive layers. SBR is better than PVA in the sense that PVA remains water-soluble even if it’s dry or exposed to moisture.
SBR is moisture-resistant once it is completely dry. It will lose its adhesive ability but will keep its sealant qualities for life. It is perfectly suitable for surfaces frequently in contact with water, like bathrooms, showers, and kitchens.
Tiling on Timber, some helpful tips:
In general, tiles should not be installed on timber directly. If tiling on timber is desired, ensure that the timber floor is prepared correctly. Timber naturally shrinks, swells, twists, and wraps due to a change in temperature or humidity. The movement in the timber subfloor causes the tiles to crack and even break.
Keep in mind the precautions mentioned in the “Tiling on Wood” section, as they are the same for tiling on timber.
Tiling on Suspended Timber Floors, some helpful tips:
In general, tiles should not be installed directly on a suspended timber floor. The movement and deflection of the floor can make the tiles crack. Depending on the construction, the floor needs to be strengthened with plywood or backer board. Alternatively, an uncoupling membrane can be used.
Methods of preparing suspended timber floors will be discussed in the next sections.
Tiling on Timber Floors, some helpful tips:
In general, tiles should not be installed directly on timber floors due to the movements and deflections of the timber. A backer board or plywood can be used to increase the rigidity of the floor. Uncoupling the floor with a membrane is also a potential solution.
The preparation of the floor includes the installation of plywood or a backer board. Plywood increases the height of the floor significantly; therefore, backer boards more suitable as they are thinner. Backer boards can be screwed down using backer board screws. An adhesive is also applied to attach the board to the floor firmly.
An alternative way to prepare timber floors for tiling is using an uncoupling membrane. Ditra is the most renowned uncoupling membrane on the market. It’s specially designed for ceramic and stone tile installations on floors. It’s made up of polyethylene and provides uncoupling to prevent cracked tile and grout. The polyethylene material makes it a waterproof layer, which protects the substrate against water, moisture, and humidity.
Timber floors are affected by water. The wood swells when it’s wet, causing problems for the tiles installed over the timber floor. The tiles and grout may crack, or the floor may rise, creating humps on the floor. This is where a membrane like Ditra helps as well. The membrane provides an isolation barrier between the timber subfloor and the tiles, protecting it from moisture.
Tiling Over Timber Floor in a Bathroom, some helpful tips:
In general, a wooden floor in a bathroom needs to be well protected against water and moisture before tiling. Ensure that the floor can handle the weight of the tiles. The best method to prepare timber floor in the bathroom is to use a cement backer board or an uncoupling membrane, such as Ditra.
● Use an Uncoupling membrame for tiling in the bathroom
In a wet location like a bathroom, a timber floor is always prone to damage. Without proper preparation, tiling over a timber bathroom floor can be risky. An uncoupling membrane like Ditra is often used for tiling on surfaces like MDF, OSB, plywood, or timber, which cannot hold the tiles alone to protect the floor. These surfaces offer a lot of movement and deflection when pressure is applied to them, and because of these bends, they result in cracking tiles. When Ditra is laid over these surfaces for tiling, it absorbs the stress that causes the cracks in tiles.
Once the ditra membrane is installed, allow the adhesive to dry completely. It would be best if you used the undiluted thin-set for an effective result to install the ceramic or any stone tiles over the Ditra matting. The reason for using the unmodified thin-set is that it maintains the strong bond between the tiles and Ditra matting in the presence of moisture.
● Use plywood or a backer board for tiling in the bathroom
Another method to prepare the timber bathroom floor for tiling is to install a cement backer board. Apply a layer of adhesive on the floor and install a backer board over it. Screw down the backer board to attach it firmly to the timber subfloor.
Water-Resistant Tiling Boards, some helpful tips:
In general, the most common water-resistant tiling board is backer boards. They provide the best surface to tile on in wet rooms and bathrooms. Due to their waterproof qualities, they’re superior to plasterboard or plywood.
There are two types of tiling backer boards. Extruded form boards and cement fiberboards. Extruded form boards are lightweight and have excellent insulative properties. These boards are easy to cut. Cement fiber boards are heavier because they are made up of solid cement fiber. These boards are used to strengthen the floor along with waterproofing it. So, if your wooden subfloor isn’t strong enough for tiling, you should use a cement backer board to provide additional strength to the subfloor.