Ditra Mat, Everything You Need to Know
Ditra Mat, a revolutionary underlayment system designed to protect and prolong the life of tile installations, has been a game-changer in the tiling industry. This innovative mat ensures that your home will boast flawless, crack-free tiles while simplifying your DIY project.
Ditra mat:
Ditra Mat is a reliable underlayment solution for tile flooring projects, offering a range of benefits such as uncoupling, waterproofing, and vapor management. Manufactured by Schluter Systems, this innovative polyethylene membrane ensures the longevity of your tile flooring while protecting your investment, particularly in wet areas like bathrooms and kitchens.
Installation involves preparing the substrate, mixing and spreading thin-set mortar, laying the Ditra Mat, installing the tiles, and grouting to achieve a durable, attractive, and easy-to-maintain surface.

Discover the benefits of using a Ditra mat for your tile flooring project. This innovative membrane system protects your floors and enhances their longevity. Dive into our comprehensive guide, which covers installation practices, technical insights, and frequently asked questions to help you achieve the best results with the Ditra mat.
Contents
- 1 Ditra Underlayment Mat
- 2 What are the applications and uses of the Ditra mat?
- 3 Is it Possible to Install Ditra Over Plywood?
- 4 Is It Possible to Install Tiles Directly onto Ditra?
- 5 When is the appropriate time to utilize Ditra?
Ditra Underlayment Mat
When renovating or remodeling your home, installing a tile floor is one of the most popular options. Tile flooring provides a durable, attractive, and easy-to-maintain surface for any room.
However, it’s essential to have a reliable underlayment system in place to protect your investment and ensure a long-lasting installation. One such underlayment solution is the Ditra Mat system. I will discuss what a Ditra Mat is, its benefits, and how to install it.
• What is a Ditra Mat?
Ditra Mat, manufactured by Schluter Systems, is a polyethylene membrane with a unique square grid design on one side and a fleece layer on the other. This innovative underlayment system provides an uncoupling layer, waterproofing, and vapor management beneath your tile flooring.
• Benefits of Ditra Mat
– Uncoupling Layer for Tile Floor
The primary function of the Ditra Mat is to serve as an uncoupling layer. This means that it separates the tile layer from the substrate, allowing the two layers to move independently.
Such a feature is beneficial as it prevents movement or stress in the subfloor from transferring to the tile floor, thus reducing the risk of tile cracking, debonding, or grout failure.
– Waterproofing Feature
Ditra Mat’s polyethylene composition also provides excellent waterproofing capabilities. This benefit is especially valuable in wet areas like bathrooms, kitchens, and laundry rooms, protecting the subfloor from water damage and mold growth.
It also ensures that the moisture from the mortar won’t accumulate beneath the tile layer and cause damage over time.
– Vapor Management
Due to the unique grid design, Ditra Mat is an effective vapor management system, enabling excess moisture to escape instead of building up under your tile flooring.
This feature is crucial in exterior applications, where temperature and humidity fluctuations may lead to moisture accumulation underneath the tiles.
• How to Install Ditra Mat
Before diving into the installation process, gathering all the necessary tools and materials is essential. You will need the following:
- Ditra Mat
- Thin-set mortar
- Notched trowel
- Utility knife
- Roller or a wooden float
- Level
– Preparing the Substrate
Before installing the Ditra Mat, ensure your substrate is clean, dry, and free of contaminants that may hinder the mortar’s bond. The substrate should also be even and structurally sound per the manufacturer’s recommendations.
– Mixing and Spreading the Mortar
To install the Ditra Mat, you will need to use a thin-set mortar. Follow the manufacturer’s instructions to mix the mortar to the proper consistency. Using a notched trowel, spread an even layer of mortar onto the substrate.
Using the right trowel size is crucial, as indicated by the Ditra Mat’s thickness.
– Laying the Ditra Mat
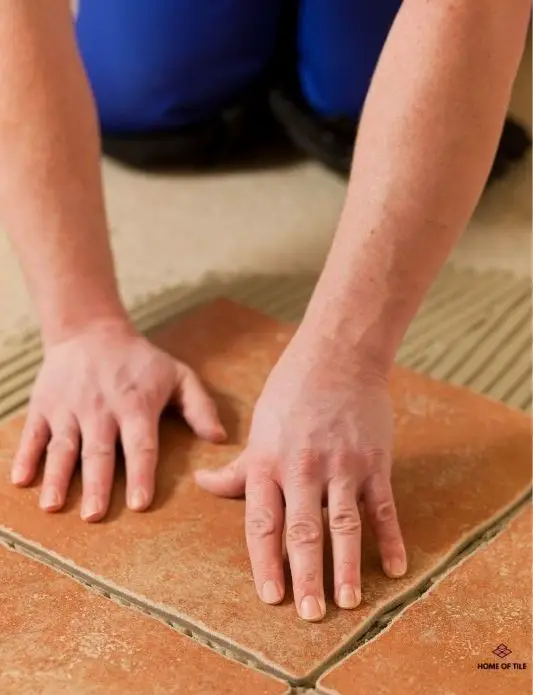
With the mortar spread, it’s time to lay down the Ditra Mat. Place the mat with the fleece side into the freshly spread mortar, ensuring full coverage and proper alignment.
Press the mat firmly into the mortar using a roller or a wooden float to eliminate any air pockets and ensure a strong bond between the mat and the substrate.
– Installing the Tiles
You can install your tiles now that the Ditra Mat is in place. Use a notched trowel to spread the thin-set mortar on top of the Ditra Mat, filling the cavities. Press the tiles firmly into the mortar, slightly wiggling them to ensure they adhere well to the uncoupling layer.
Use a level to ensure that the tiles are flat and even.
– Grouting the Tiles
After allowing the mortar to set according to the manufacturer’s instructions, it’s time to grout the tile joints. Use a grout float to spread the grout, ensuring it fills the joints thoroughly. Wipe away excess grout with a damp sponge before it dries.
• Final Thoughts on Ditra Mat
The Ditra Mat is a versatile, reliable underlayment option for your tile flooring project. Its uncoupling, waterproofing, and vapor management features offer numerous benefits and ensure the longevity of your tile flooring.
As with any installation project, always follow the manufacturer’s recommendations and guidelines, and don’t hesitate to seek professional help if needed.
Remember that investing in a proper underlayment system like the Ditra Mat will protect your investment, increase the value of your home, and save you time and money in the long run.
What are the applications and uses of the Ditra mat?
Ditra mat, also known as Ditra membrane or Ditra underlayment, is a versatile product with numerous applications in tiling and flooring. Developed by Schluter Systems, it is widely used by professionals and DIY enthusiasts to ensure that tiles are laid on a solid, uncoupling, and waterproof foundation.
I will discuss the main purposes and benefits of using the Ditra mat and provide practical tips for its installation.
• Key Functions of Ditra Mat
– Uncoupling
One of the primary purposes of the Ditra mat is to serve as an uncoupling layer between the substrate and the tiled surface. This means that the membrane allows a certain degree of movement between the two layers, preventing the transfer of stress and potential cracks from the subfloor to the tiles.
This is particularly important when laying tiles on a wooden subfloor or over substrates prone to expansion and contraction due to temperature fluctuations, humidity, and moisture.
– Waterproofing
Ditra mat is an effective waterproofing barrier, protecting the substrate from water penetration and potential damage. This is especially crucial in wet areas, such as bathrooms, showers, and laundry rooms, where a leak could lead to significant structural issues.
When installed correctly, the mat prevents water from reaching the subfloor, safeguarding it from rot, mold, and mildew.
– Vapor Management
Another important function of the Ditra mat is its ability to manage vapor transmission. The mat’s unique design allows air circulation between the tiles and the substrate, allowing moisture to evaporate easily.
This feature is particularly beneficial in installations with a risk of moisture accumulation beneath the tile, such as basements or concrete slabs with high moisture content.
• Advantages of Using Ditra Mat
– Enhanced Durability
The Ditra mat enhances the durability and longevity of tiled surfaces by providing uncoupling, waterproofing, and vapor management. The membrane helps prevent tile cracking and delamination, ensuring the floor remains stable and visually appealing for an extended period.
– Wide Range of Applications
Ditra mat can be used with various substrates and tile materials, making it a versatile and convenient option for numerous projects.
It is suitable for use with substrates such as plywood, OSB, concrete, and radiant-heated floors, and it can be installed with ceramic and natural stone tiles.
– Easy Installation
While the installation requires attention to detail, the Ditra mat is relatively easy to work with. Its lightweight, flexible nature makes it popular among professionals and DIY enthusiasts.
• Installing Ditra Mat: Practical Tips
– Proper Substrate Preparation
Before installing the Ditra mat, it is crucial to ensure the substrate is clean, level, and structurally sound. Remove any dust, debris, or loose materials that could interfere with proper adhesion.
This may involve sanding or grinding high spots, filling in low spots with leveling compounds, and making necessary repairs to the subfloor.
– Using the Right Adhesive
Using the correct adhesive for bonding the Ditra mat to the substrate is essential. Schluter Systems recommends using a modified thin-set mortar for most substrates, but an unmodified thin-set mortar is required when installing the mat over a concrete slab with a high moisture content.
Always follow the manufacturer’s guidelines and recommendations for adhesive types and mixing ratios.
– Proper Trowel Selection
The right trowel is crucial for achieving a good bond between the substrate, Ditra mat, and the tiles. A square-notch trowel with a 1/4-inch notch depth is typically recommended for embedding the Ditra mat into the thin-set mortar.
For laying the tiles on top of the mat, the appropriate trowel size will depend on the size and thickness of the tiles.
– Adhering to Recommended Grout and Sealant Guidelines
When grouting the tiled surface, use a grout compatible with the Ditra mat and follows the manufacturer’s recommendations for joint width and grout type.
Additionally, any seams or edges where the Ditra mat meets other surfaces should be sealed with a suitable, high-quality sealant to ensure a fully waterproof installation.
• In Conclusion
Ditra mat is an invaluable tool in tiling and flooring, providing numerous benefits, such as uncoupling, waterproofing, and vapor management.
By following proper installation guidelines and utilizing this membrane, professionals and DIY enthusiasts alike can achieve a durable, long-lasting, and visually appealing tiled surface for any project.
Is it Possible to Install Ditra Over Plywood?
• Understanding Ditra
Ditra is a polyethylene uncoupling membrane designed to decouple and prevent cracks from transferring through tile and stone flooring. It is popular for residential and commercial applications thanks to its compatibility with various substrates, including plywood.
Uncoupling is essential to any tile installation, especially on plywood subfloors. This is because plywood can be subject to expansion and contraction due to changes in temperature and humidity, leading to shifting and cracking of tile and grout.
Ditra provides this uncoupling layer, allowing for the natural movement of the subfloor without affecting the tiled surface.
Before installing Ditra over plywood, it’s important to understand the factors that come into play when working with these materials.
• Plywood Subfloor Considerations
– Thickness
It is crucial to use an adequately thick plywood subfloor to provide a stable base for your tile installation. The thickness required will depend on the type of plywood and the spacing of the floor joists.
For joist spacing up to 16 inches on center (OC), a minimum of 5/8-inch thick exterior-grade plywood or OSB is recommended. For joist spacing between 16 and 19.2 inches OC, a minimum of 3/4-inch thick exterior-grade plywood or OSB should be used.
– Flatness
The surface of the plywood subfloor must be flat and free of debris, dirt, and any other contaminants. This ensures a proper bond between the Ditra membrane and the subfloor.
The subfloor should be checked for flatness using a 10-foot straight edge or a suitable alternative. Any high spots should be sanded down, while low spots should be filled with an appropriate leveling compound.
– Moisture
Plywood can be susceptible to high moisture levels, which may lead to problems with your tile installation, such as warping or mold development. Before laying Ditra over your plywood subfloor, it is essential to ensure that the moisture content is within the acceptable range for your specific tile installation materials. This will typically be between 9% and 14% for most applications.
If the moisture content of the plywood is too high, it is necessary to take steps to address the issue, such as installing a vapor barrier or moisture mitigation system before the Ditra installation.
• Installing Ditra Over Plywood
– Preparing the Plywood Subfloor
- Remove any loose or damaged material from the plywood subfloor, ensuring it is clean and debris-free.
- Confirm that the moisture content of the plywood is within the acceptable range for your tile installation materials.
– Applying the Thinset Mortar
- Choose a latex-modified thinset mortar compatible with the plywood subfloor and the Ditra membrane. This mortar type is designed to bond with the plywood and provide a robust base for the uncoupling membrane.
- Mix the latex-modified thinset mortar per the manufacturer’s instructions, ensuring it has a consistency similar to that of pancake batter.
- Spread the thinset mortar using a 1/4 inch x 3/16 inch V-notched trowel, ensuring full coverage of the plywood subfloor.
– Installing the Ditra Membrane
- Lay the Ditra membrane on top of the thinset mortar, fleece-side down, ensuring it is properly engaged in the mortar.
- Smooth the membrane using a wood or plastic trowel, removing any air pockets and ensuring full contact between the membrane and the thinset.
- Repeat steps 5 to 7 until the entire plywood subfloor is covered with the Ditra membrane.
- Allow the thinset mortar to cure per the manufacturer’s instructions, typically 24 hours.
• Conclusion
Yes, you can install Ditra over a plywood subfloor, provided the appropriate steps are taken to ensure a stable and flat base for your tile installation.
By following the outlined process and recommendations, you can achieve a successful and long-lasting installation that allows for the natural movement of the plywood subfloor without compromising the integrity of your tile and grout.
Is It Possible to Install Tiles Directly onto Ditra?
• What is Ditra?
Ditra is an underlayment membrane manufactured by Schluter Systems, designed to provide a strong and stable foundation for tile installations. It is a lightweight yet highly durable polyethylene material with uncoupling, waterproofing, and vapor management properties.
It is ideal for use in various applications, including wet areas like bathrooms and exterior spaces.
• Benefits of Using Ditra
There are several reasons why you may consider using Ditra as an underlayment for your tile installation:
– Uncoupling Properties
One of the primary benefits of Ditra is its uncoupling ability. This means that it helps to prevent the transfer of stresses and movements between the substrate and the tiles, effectively reducing the risk of tile damage due to cracking, chipping, or delamination.
– Waterproofing and Vapor Management
Ditra is not only a great uncoupling membrane, but it also provides excellent waterproofing and vapor management properties. This means it can prevent moisture from penetrating the substrate, leading to mold growth and other issues.
This is particularly important in wet areas like bathrooms and exterior spaces.
– Easy to Install
Ditra is lightweight and easy to handle, making it a popular choice among professionals and DIY enthusiasts. Its thin profile also means that it does not add significant height to your floor, which can be beneficial when transitioning between different flooring materials.
• Preparing the Substrate for Ditra
Before you can tile directly onto Ditra, it is essential to ensure that the substrate is adequately prepared. This means the surface should be clean, flat, and free of contaminants that could compromise the bond between the Ditra membrane and the substrate.
To prepare the substrate, follow these steps:
- Remove loose or damaged materials using a scraper or chisel, such as crumbling concrete or old adhesive.
- Check the substrate for level, as any uneven areas may need to be addressed before installing Ditra. You can use a leveling compound to correct any minor imperfections.
- Clean the substrate thoroughly, removing dust, grease, and other contaminants that could compromise the bond between the Ditra membrane and the substrate.
- If installing Ditra on a wooden substrate, make sure that the floor is structurally sound and able to support the weight of the tile installation.
• Installing Ditra
Once the substrate has been prepared, you can install the Ditra membrane. Here are the basic steps to follow:
- Measure the area to be tiled and cut the Ditra membrane to size using a utility knife.
- Apply a suitable adhesive (thin-set mortar) to the substrate using a notched trowel. The size and type of trowel will depend on the specific adhesive being used, as well as the texture and porosity of the substrate.
- Press the Ditra membrane into the adhesive, removing air bubbles and achieving full contact between the membrane and the substrate. Use a roller or a flat trowel to ensure strong adhesion.
- Allow the adhesive to cure as specified by the manufacturer before proceeding with the tile installation.
• Tiling Onto Ditra
With the Ditra membrane properly installed, you can tile directly onto it. Follow these steps to ensure a successful tile installation:
- Select a proper adhesive for your specific tile type and follow the manufacturer’s instructions for mixing and application.
- Applying the adhesive to the Ditra membrane using a notched trowel ensures full coverage and consistent depth.
- Press the tiles into the adhesive, maintaining consistent spacing and alignment. You may use tile spacers to help achieve even grout lines.
- Allow the adhesive to cure as specified by the manufacturer before proceeding with the grout application.
- Apply grout to the tile joints, using a grout float to work the grout into the spaces between the tiles. Remove excess grout and clean the tile surfaces using a damp sponge.
- Once the grout has cured, apply a sealer to protect against staining and moisture penetration.
• Tips and Recommendations
Here are some additional tips and recommendations to help ensure a successful tile installation on Ditra:
- Always follow the manufacturer’s instructions for the specific products you are using, including adhesives, grouts, and sealers.
- Use the appropriate type of adhesive for your specific tile type and substrate material. Using the wrong adhesive can lead to bond failure and potential tile damage.
- Monitor the temperature and humidity levels during the installation process, as extreme conditions can affect the performance of adhesives and grouts.
- Be patient and allow adequate time for the adhesive and grout to cure before placing any stress on the tile installation, such as walking on the floor or applying heavy loads.
In conclusion, tiling directly onto Ditra is a viable option for providing a strong and stable foundation for your tile installation. By properly preparing the substrate, installing the Ditra membrane, and following the appropriate techniques for tile installation, you can achieve a durable, long-lasting surface that will provide years of enjoyment and functionality.
When is the appropriate time to utilize Ditra?
• Introduction to Ditra
Ditra is a polyethylene membrane designed by Schluter Systems specifically for tile installations. Its main purpose is to provide a reliable and stable surface for tiles while offering waterproofing and uncoupling properties. Ditra has become increasingly popular among contractors, architects, and DIY enthusiasts due to its easy installation process and proven results.
In this guide, we will explore the various scenarios in which Ditra is highly recommended and when it is essential for achieving professional, long-lasting tile installations.
• The Benefits of Using Ditra
Before discussing when to use Ditra, it is essential to understand its benefits and advantages over traditional installation methods. Here is a list of the primary benefits that make Ditra a popular choice for many tile installations:
1. Uncoupling
Ditra is designed to offer uncoupling, which isolates the tile layer from the substrate and prevents stresses and movements from transferring between them. This helps to eliminate tile cracking and delaminating, ensuring a durable and resilient installation.
2. Waterproofing
The Ditra membrane is inherently waterproof and provides a reliable barrier against moisture ingress. When installed correctly, it protects the substrate from potential defects and damages caused by moisture, making it suitable for use in wet areas such as bathrooms, kitchens, and other moisture-prone environments.
3. Vapor management
Ditra allows moisture to evaporate and dissipate through the interconnected channels present in its structure. This helps to prevent excess moisture from accumulating beneath the tiles, minimizing the risk of mold growth and other moisture-related issues.
4. Load distribution
The geometric design of Ditra enables it to distribute loads effectively, allowing it to support even heavy and large-format tiles. This results in a stable and long-lasting installation, even in high-traffic areas.
• When to Use Ditra: Recommended Applications
1. Installing Tiles over a Wood Subfloor
Wood subfloors naturally expand and contract with changes in temperature and humidity, which can cause tile cracking and delamination. Ditra can help alleviate this problem by providing uncoupling between the wood substrate and the tiled surface.
By allowing the substrate to move independently of the tiles, Ditra prevents stresses and strains from being transferred onto them, protecting them from potential cracking and delamination.
2. Tile Installations in Wet Areas
Ditra’s waterproof properties make it an excellent choice for tiling in wet areas such as bathrooms, showers, and saunas. It can be a waterproof barrier beneath the tiles, preventing moisture damage and mold growth.
This is especially important in areas where moisture is likely to accumulate, such as shower floors and walls, kitchen sinks, and around bathtubs.
3. Installing Large-Format Tiles & Natural Stone Tiles
Large-format and natural stone tiles are more prone to cracking and delamination due to uneven load distribution. Ditra helps distribute the weight evenly, allowing these tiles to be installed securely and effectively.
Additionally, Ditra’s uncoupling properties prevent any substrate movement from causing damage to the tiles, ensuring a durable and long-lasting installation.
4. Tiling on Heated Floors
Heated floors are subject to regular temperature changes, which can cause the substrate to expand and contract. Installing a Ditra membrane between the heated floor and the tiles provides uncoupling, ensuring that the tiles remain unaffected by these movements.
Furthermore, Ditra’s ability to withstand high temperatures makes it suitable for heated floor applications.
5. Renovation & Remodeling Projects
When carrying out a renovation or remodeling project that involves replacing or updating a tiled surface, Ditra can be of great use. It can be installed over various substrates, including cracked and slightly uneven surfaces, providing a stable and reliable base for the new tiles.
Its slim profile makes it ideal for adding a new tiled surface without significantly increasing the floor height.
• Conclusion
In conclusion, Ditra is essential for achieving professional, durable, and long-lasting tile installations. Its uncoupling and waterproofing properties make it highly recommended for use in various situations, including installing tiles over wood subfloors, wet area applications, large-format and natural stone tiles, heated floors, and renovation projects.
By understanding the benefits and the appropriate situations to utilize Ditra, you can ensure successful tile installations that achieve functionality and aesthetic appeal.