How to Grout Tile Like a Pro, with more than 25 tips
Are you looking to give your space a polished, durable finish that will last years? Perfecting the art of grouting tile can make all the difference between a professional-looking job and a DIY disaster. Let’s explore the crucial steps to achieving flawless grout lines while avoiding common pitfalls.
Grouting tile:
Choose the right grout type (sanded or unsanded) and color for your tile project. Prepare the surface by cleaning the tile and taping off vulnerable areas. Follow the manufacturer’s instructions to mix, slake, and re-mix the grout. Apply the grout using a rubber float and remove excess before cleaning the tiles with a damp sponge.
Inspect the grout lines, allow them to dry, and apply grout sealer to protect against water damage and stains. For wet areas, choose grout with antimicrobial additives, and use a grout colorant for consistent coloration. Wear safety glasses and gloves during the process.
You’re here to learn the essential steps to grout your tiles expertly. Let’s dive into mixing, applying, and finishing grout like a pro, turning your DIY project into a stunning, long-lasting masterpiece. Ready? Let’s commence!
Contents
- 1 Applying Grout to Tile
- 2 What is the recommended duration for waiting before wiping off grout?
- 3 Is it necessary to clean the grout before it dries completely?
- 4 What are the procedures involved in the process of grouting tiles?
- 5 What is the recommended duration for grout to set before sponging it?
Applying Grout to Tile
• Choosing the Right Grout
Selecting the right grout for your tile project is essential to achieve a professional finish. There are two main types of grout: sanded and unsanded.
– Sanded Grout
Sanded grout is a mixture of cement, sand, and water. It is ideal for larger grout joints, typically 1/8 inch or larger. The added sand increases the grout’s durability, making it less prone to cracking. Sanded grout is best suited for floor tiles, providing additional strength to withstand foot traffic.
– Unsanded Grout
Unsanded grout is made of cement and water without any sand in the mixture. It is suitable for smaller grout joints, typically less than 1/8 inch. Unsanded grout is more flexible and can easily fill small gaps, making it perfect for delicate surfaces like glass, ceramic, and polished stone tiles.
When choosing grout, consider the color best complements your tile. Grout can either blend with your tile, which helps create a seamless appearance, or contrast with it, which can help accentuate the design.
• Preparing the Surface
Before grouting, ensure the tile adhesive has fully dried, per the manufacturer’s recommendation. This usually takes 24 to 48 hours, depending on the adhesive used.
- Clean the tile surface: Remove any dust, dirt, or other debris that may have accumulated during installation. Carefully scrape off any excess adhesive with a plastic scraper.
- Tape off vulnerable areas: Protect areas where you don’t want grout, such as baseboards and trim, with painter’s tape.
• Mixing the Grout
Follow the manufacturer’s instructions for mixing the grout, as different products may have unique requirements. In general, here are the basic steps to mix grout:
- Measure the dry grout powder and water: Use a clean container and measuring tools to ensure accurate measurements.
- Combine the grout powder and water: Slowly add water to the grout powder, mixing as you go. Use a grout mix paddle attached to a power drill for faster and more consistent results.
- Mix to a smooth consistency: Aim for a thick but smooth and spreadable paste. Be sure to scrape the sides and bottom of the container to ensure all the powder is well incorporated.
- Let the mixture slake: Allow the grout to rest for the recommended slaking time, generally around 5-10 minutes.
- Mix again: Give the grout a final stir to ensure it’s well-mixed and ready for application.
• Applying the Grout
- Prep the work area: Have a bucket of clean water and a large sponge handy.
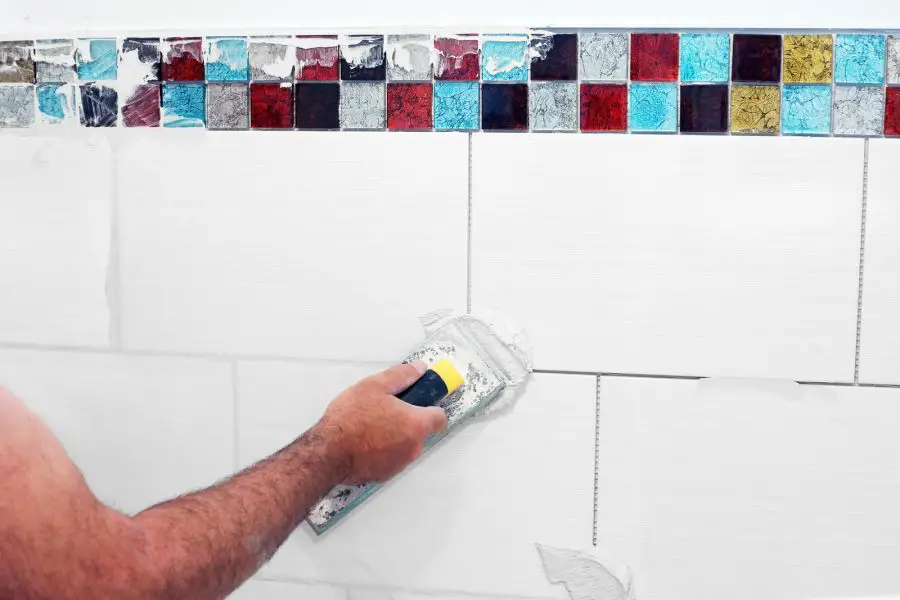
- Spread the grout: Scoop a small amount onto a rubber grout float, and hold the float at a 45-degree angle against the tile. Move the float diagonally across the tile surface to fill the grout joints evenly. Use enough pressure to ensure the joints are completely filled.
- Remove excess grout: Hold the grout float at a 90-degree angle and scrape off any excess grout from the tile surface.
- Clean the tiles: Wait 15-20 minutes for the grout to set. Then, using a damp sponge, gently wipe the tiles in a circular motion to remove any residual grout haze. Rinse the sponge frequently in clean water as you work.
• Finishing the Grouting Process
- Inspect the grout lines: After cleaning away the grout haze, inspect them to ensure they are even and smooth. If any areas require touch-ups, use a small spatula or your finger to fill in gaps with additional grout.
- Allow the grout to dry: Let it dry completely according to the manufacturer’s instructions before exposing it to water, such as in a shower. Drying time may vary between 24 and 72 hours, depending on the grout product used.
- Apply a grout sealer: Once the grout is fully dry, protect it from water damage and prevent stains. Follow the sealer manufacturer’s instructions for the application process.
• Expert Tips
- When grouting tiles in wet areas like bathrooms, opt for grout with built-in antimicrobial additives to prevent mold and mildew growth.
- To achieve a consistent color in your grout lines, try using a grout colorant instead of relying solely on the color of the grout mix.
- Always wear safety glasses and gloves when handling grout to protect your eyes and skin.
What is the recommended duration for waiting before wiping off grout?
Maintaining tile installations comes into play promptly after installing them. The application of grout marks the final stage of the installation process. Wiping off grout is essential to achieving clean and beautiful tile work.
Knowing the optimal time to wait before removing grout is crucial for the best results. This guide contains an in-depth discussion on how long you should wait to wipe off the grout.
• The Importance of Proper Grout Curing Time
– Aesthetic Appeal
The visual impact of finished tile works is a significant reason for wiping off the grout. Unclean grout lines can cause the tiled surface to look unappealing and dirty. Timely wiping off grout enhances the tiles’ appearance and ensures that the grout color stays consistent throughout.
– Structural Integrity
To achieve maximum structural strength, the grout should be given adequate time to set and cure before wiping it off. While wiping off residue at the right time improves aesthetics, allowing the grout to cure correctly ensures its long-term durability.
• Factors Affecting Grout Wiping Time
– Type of Grout
There are two main types of grout: cement-based and epoxy-based. Each type has its drying and curing time frames, which will influence the waiting time for wiping off excess grout.
Cement-based grout: This is the most common type used for tile installations. Before wiping off cement-based grout residue, the waiting time usually ranges between 20 and 45 minutes. This waiting time will allow the grout to set up and become strong enough to hold its shape when wiped with a damp sponge.
Epoxy grout: Epoxy-based grout has a faster curing process than cement-based grout. Typically, you should begin wiping off within 15 to 20 minutes after application. Delaying it may lead to epoxy grout hardening, making it difficult to clean off the residue.
– Environmental Factors
Environmental factors such as temperature and humidity also influence the speed of grout drying and curing. Higher temperatures accelerate the curing process, whereas high humidity may prolong it. Consider wiping off grout sooner than the prescribed waiting time in hot and dry climates.
Conversely, in humid conditions or rooms with low air circulation, you may need to wait longer.
• The Grout Wiping Process
– Step 1: Preparation
Before commencing the wiping process, ensure you have the necessary tools and materials, including:
- Clean bucket(s) of water
- A grout sponge or microfiber cloth
- Cleaning gloves
Set a Timer: Set a timer based on the type of grout used and the specific product instructions. This will help you avoid wiping off grout too soon or too late.
– Step 2: Testing the Grout
Before wiping off the grout, test its readiness by gently pressing your finger against the grout line. If the grout does not leave a residue on your finger, it is ready for wiping. However, if it feels too soft or wet, give it additional time to set.
– Step 3: The Wiping Technique
Proceed to wipe off the grout with a damp grout sponge or microfiber cloth. Be gentle, and do not apply excessive pressure to avoid digging into the grout lines. Clean the sponge or cloth frequently in the bucket of water to avoid reapplying grout residue onto the tiles.
– Step 4: Final Cleaning
Once you have effectively wiped off the grout residue, clean the tiles using clean water and a fresh sponge or cloth. This will remove any remaining grout haze for a pristine finish.
• Pro Tips for Better Grout Wiping
- Follow manufacturer’s instructions: Adhere to the recommended waiting time in the grout product instructions.
- Mix grout properly: Ensure you mix the grout according to the manufacturer’s directions to avoid inconsistencies in drying time.
- Work in sections: It is always best to tackle one area at a time, especially for large surfaces, to ensure effective cleaning and prevent grout from drying too much.
- Patience is key: Resisting the urge to wipe off grout prematurely is essential. Waiting for the recommended time will yield a better result in the long run.
• Conclusion
Wiping off grout is an integral part of tile installations. Understanding the ideal waiting time and the factors influencing it ensures you achieve aesthetic appeal and structural integrity in your tile works.
Following my tips and techniques, you can confidently carry out the grout wiping process and maintain your tiles’ pristine appearance.
Grout Type | Wiping Time |
|---|---|
Non-sanded grout | 15-30 minutes |
Sanded grout | 30 minutes to 1 hour |
Epoxy grout | 5-10 minutes |
Is it necessary to clean the grout before it dries completely?
Grouting is essential to any tile installation project, whether you’re working on a bathroom, kitchen, floor, or even an outdoor space. One crucial question that often arises during the grouting process is whether or not to wipe the grout before it dries.
I will answer this question in detail and provide tips and recommendations for achieving the best possible results.
• The Importance of Wiping Grout
The primary purpose of wiping grout is to remove excess grout from the surface of the tiles and to shape the grout lines for a professional, aesthetically pleasing finish.
Failing to wipe grout during the installation process can lead to a messy appearance and even impact the overall integrity of your tiling project. Given these consequences, grout must be wiped out before it dries.
• Proper Technique for Wiping Grout
The method you use to wipe grout can significantly influence your project’s final look and durability. Follow the steps below to execute the perfect grout-wiping technique:
– Step 1: Allow Initial Setting
After applying grout to the tile joints, allow it to set for 15-30 minutes. This initial setting time lets the grout gel and slightly harden, making it easier to remove excess grout without disturbing the grout lines.
– Step 2: Choose the Right Sponge
Select a damp, high-quality sponge with rounded corners. The rounded edges prevent the sponge from digging into the grout lines, while the dampness helps to remove the excess grout more efficiently. Be sure to rinse the sponge frequently throughout the process to maintain effectiveness.
– Step 3: Wipe in a Diagonal Direction
When wiping grout, use light pressure and a diagonal motion. This movement ensures you’re not inadvertently removing too much grout from the joints. It also aids in shaping the grout lines for a uniform appearance.
– Step 4: Perform Multiple Passes
Grout residue, or grout haze, is common when working with grout. To minimize the chances of haze formation, make multiple passes over the tiles with your damp sponge. Rinse the sponge in clean water between passes and wring out as much excess water as possible.
• Recommendations for Desired Grout Finish
Achieving the perfect grout finish depends on various factors, including the type of grout, tile material, and personal preferences. Below are some recommendations to help you achieve the desired finish:
– Choose the Right Grout
There are two main types of grout: sanded and unsanded. Sanded grout is ideal for tile joints larger than 1/8 inch, while unsanded grout suits smaller joints. The correct grout type is essential for a visually appealing and robust outcome.
– Select the Proper Grout Color
Grout color can significantly impact the look of your tiled area. A color contrasting with the tiles will emphasize the grout lines, while a matching color will create a more uniform appearance. Opt for a neutral shade that complements the tile color when in doubt.
– Invest in a Grout Sealer
Applying a grout sealer can help protect your tiling project from stains, mildew, and other contaminants. Approximately 48-72 hours after completing the grout-wiping process, apply a high-quality sealer according to the manufacturer’s instructions.
This extra step can make all the difference in keeping your tiling project looking beautiful for years.
• Final Thoughts
Wiping grout before it dries is critical to a successful tiling project. Following the proper technique, choosing the right grout, and considering additional factors like color and sealer application will significantly impact your overall results.
Armed with the knowledge and recommendations in this article, you’re ready to tackle any grouting project with confidence and ease.
What are the procedures involved in the process of grouting tiles?
Grouting plays a crucial role in the appearance and durability of your new tile installation. Whether it is a bathroom, kitchen, or any other area with tiles, the grout helps to fill the gaps between the tiles, providing them with stability and preventing moisture from seeping underneath.
I will provide a detailed guide on the steps involved in grouting tile and the importance of doing it correctly for the best results.
• Choosing the Right Grout for Your Tiles
When selecting the grout for your tiling project, choosing the one that best suits your specific needs is important. There are two main types of grout: sanded and unsanded. The choice between these two types of grout will largely depend on the size of the gaps between your tiles.
– Sanded Grout
I recommend using sanded grout for gaps larger than 1/8 inch. This type of grout contains fine sand, which provides extra strength and minimizes shrinkage when it dries. Sanded grout is also resistant to cracking and is a great choice for use in high-traffic areas or areas exposed to frequent moisture.
– Unsanded Grout
Unsanded grout is best suited for gaps smaller than 1/8-inch. This type of grout does not contain sand, which makes it easier to apply and smoother in texture. Unsanded grout is a good choice for delicate materials such as glass, marble, or metal tiles, as it will not scratch their surfaces.
• Preparing the Area for Grouting
Before starting the grouting process, some essential steps need to be taken to prepare the area for grouting effectively.
- Ensure tiles are clean: Make sure the tiles are free of any debris, dust, or adhesive before grouting. Any particles left on the tiles can create an uneven and unprofessional finish.
- Ensure tiles are properly set: Check that the tiles adequately adhere to the surface and that the adhesive has fully dried. Premature grouting may lead to uneven tiles, instability, and other issues down the line. Refer to the tile adhesive manufacturer’s recommendations for drying times.
- Plan your exit strategy: To avoid stepping or working on the freshly applied grout, plan your grouting steps so you do not accidentally walk on the newly installed floor. It is advised to start grouting from the farthest corner of the room, making your way toward the exit.
• Steps for Grouting Your Tiles
Now that you are ready to start the grouting process, follow these steps for a seamless and professional finish.
1. Mixing the Grout
Begin by mixing the grout according to the manufacturer’s instructions. It is essential to achieve the right consistency, as grout that is too thick or too thin can cause problems during application and drying.
My recommendation for the perfect grout consistency: Aim for a mixture that resembles peanut butter without any lumps or dry spots. Mix the grout thoroughly with a margin trowel or a low-speed power mixer, ensuring the even distribution of color and texture.
2. Applying the Grout
To apply the grout, use a rubber float, pressing it firmly into the joints. Hold the float at a 45-degree angle and spread the grout across the surface of the tiles, filling all gaps between them.
Tip for a clean grout application: Scrape off any excess grout using the edge of the float, moving diagonally across the tiles to avoid gouging the grout from the joints.
3. Cleaning the Tiles
Wait 15-30 minutes (depending on the grout manufacturer’s recommendations) after applying the grout and cleaning the tiles. Prepare a bucket of clean water and a large sponge to do so. Gently wipe the tiles with the damp (not soaking wet) sponge in a circular motion to remove any grout residue on their surface.
Tip for efficient cleaning: Frequently rinse the sponge in clean water and change the water in the bucket as it becomes murky to avoid spreading the grout residue back onto the tiles.
4. Final Touches
After approximately 24 hours (or according to the grout manufacturer’s instructions), a haze might appear on the surface of the tiles. This haze can be easily removed by buffing the tiles with a clean, dry cloth.
Once the grout is fully cured, apply a high-quality sealer to protect it from stains and moisture. Follow the sealer manufacturer’s instructions for proper application and drying times.
• Conclusion
A well-executed grouting process is critical in any tile installation, whether in a bathroom, kitchen, or other space. Following these steps and using the right grout will achieve a durable and visually appealing finish in your tiling project.
Remember, the right tools, high-quality materials, and proper techniques will be key to achieving the best results in your grouting journey.
Step | Description |
|---|---|
1 | Choose the correct grout for your tile type and room application. |
2 | Mix the grout according to the manufacturer’s instructions. |
3 | Apply the grout using a grout float, working at a 45-degree angle and pressing the grout firmly into the tile joints. |
4 | Remove excess grout from the tile surface using the grout float edge, again working at a 45-degree angle. |
5 | Allow the grout to dry for 24 hours or as specified by the manufacturer. |
6 | Allow the grout to dry for 24 hours, or as specified by the manufacturer. |
7 | Remove any remaining grout haze from the tile surface using a dry cloth or cheesecloth. |
8 | Apply a grout sealer if necessary, following the manufacturer’s application guidelines. |
What is the recommended duration for grout to set before sponging it?
Grouting is an essential step in the installation process of tiles, whether for a bathroom, kitchen, or any other area in your home. One crucial aspect of the grouting process is knowing when to sponge off the excess grout after it has been applied.
To achieve a smooth, professional finish, it is important to understand the correct timing for sponging.
This article will provide an in-depth look at the ideal sponging time for grout and the factors that can influence this timeline.
• The Ideal Sponging Time
In general, the recommended waiting time before sponging grout is about 15 to 30 minutes. This allows the grout to become firm enough that it does not get damaged when sponged but is still soft enough to be easily removed from the surface of the tiles.
It is important to pay close attention to the grout manufacturer’s specific instructions, as different products may have slightly different recommended waiting times.
It is also worth mentioning that the waiting time before sponging can be influenced by various factors, such as the type of grout, the room temperature, and the humidity.
– Type of Grout
Several types of grout are available in the market, and each may have slightly different sponging times. The two most common types of grout are cement-based grout and epoxy grout.
Cement-Based Grout
Cement-based grout is the most common type used for residential tiling projects. This grout is typically made from cement, sand, and water. Cement-based grouts come in both sanded and unsanded variants. Sanded grout is ideal for larger grout joints, while unsanded grout is best for smaller joints.
Sponging time for cement-based grout generally falls within the 15-30-minute timeframe mentioned earlier. However, it is essential to follow the manufacturer’s guidelines, as the specific composition of the grout may affect the waiting time.
Epoxy Grout
Epoxy grout is more durable and water-resistant, making it suitable for areas exposed to high moisture levels or heavy use. This type of grout consists of epoxy resin and a filler powder that forms a strong, stain-resistant bond when mixed.
Due to its unique composition, epoxy grouts may have different sponging time requirements than cement-based grouts. Some epoxy grouts may require 10 minutes, while others may need a couple of hours before they can be safely sponged.
It is crucial to check the manufacturer’s instructions for the exact waiting time.
– Temperature and Humidity
The temperature and humidity levels in the room where you are grouting can also influence how long you should wait before sponging. The grout may set more quickly at higher temperatures and lower humidity, meaning you may have less time to wait before sponging.
Conversely, lower temperatures and higher humidity can extend the time for the grout to firm up.
If you work in a particularly hot or cold environment, monitoring the grout’s consistency and adjusting your sponging time accordingly is essential.
• Additional Tips for a Successful Grouting Job
– Choosing the Right Sponge
The right sponge is crucial to achieving a clean and professional grout finish. A quality grouting sponge should have rounded edges, be hydrophilic (water-absorbing), and feel soft when wet. Coarse or abrasive sponges should be avoided, as they may cause damage to the grout and tiles.
– Using the Right Pressure
When sponging the grout, applying gentle and even pressure is essential, avoiding the temptation to scrub too hard. Pressing too firmly may remove too much grout from the joints or cause damage to the tiles.
– Cleaning the Grout Haze
After the grout has fully cured, which might take 24-48 hours, depending on the product, a grout haze may still be visible on the surface of the tiles. You can use a clean, dry cloth or a special grout haze remover to gently buff and polish the tile surface to remove this haze.
• Conclusion
Knowing the correct time to wait before sponging grout is essential in achieving a professional finish on your tiling project. By considering factors such as grout type, room temperature, and humidity and following the manufacturer’s recommendations, you can ensure that your grout will have a smooth and even appearance.
Remember that choosing the right tools and using the proper technique will also contribute to the success of your grouting job.