Remove Grout Easily: Expert Techniques for Stunning Results
Are you tired of staring at the unsightly grout between your tiles? Does that dingy and discolored filler gnaw at your inner perfectionist? Your worries end here! This blog post outlines simple and effective ways to remove grout from your beautiful tiles, giving them a fresh, revitalized look.
Removing grout from tile:
This guide covers removing grout residue from tile surfaces safely and effectively. It recommends gathering essential tools such as grout removal, safety goggles, dust masks, etc. The guide details the steps of choosing the right grout removal tool, preparing the area, removing grout between tiles, cleaning up debris, re-grouting, and sealing the grout.
With proper tools, patience, and technique, removing grout can greatly improve the appearance and functionality of tiled surfaces.

Discover the best techniques and tools for efficient grout removal, whether for a small touch-up or a complete renovation. Continue reading to find tips, tricks, and step-by-step instructions for restoring your tile to its pristine state.
Contents
- 1 Eliminating Grout Residue from Tile Surfaces
- 1.1 • Overview
- 1.2 • Tools and Materials
- 1.3 • Step 1: Choose the Right Grout Removal Tool
- 1.4 • Step 2: Prepare the Area and Safety Precautions
- 1.5 • Step 3: Removing Grout between Tiles
- 1.6 • Step 4: Clean up Debris and Inspect Tiles
- 1.7 • Step 5: Re-Grouting the Tiles
- 1.8 • Step 6: Sealing the Grout
- 1.9 • Conclusion
- 2 What is the most effortless method to eliminate grout from tiles?
- 3 Is it Possible to Remove Grout Without Causing Damage to the Tiles?
- 4 What are the appropriate methods for removing dried grout from tile surfaces?
- 5 What is the Most Effective Technique for Removing Grout?
Eliminating Grout Residue from Tile Surfaces
• Overview
Grout is essential to any tile installation, providing support to keep the tiles in place, sealing out moisture, and improving the installation’s appearance. Over time, however, grout can become discolored, cracked, or damaged, necessitating removal and replacement to maintain the integrity and appearance of your tiled surface.
I will walk you through removing grout from the tile safely and effectively.
• Tools and Materials
Before beginning the process of removing grout from the tile, gather the following tools and materials:
- Grout removal tool (manual or power)
- Vacuum cleaner or shop vac
- Safety goggles
- Dust mask
- Stiff-bristle brush
- Bucket
- Water
- Sponge or cloth
- New grout
- Grout float
- Rubber gloves
- Grout sealer
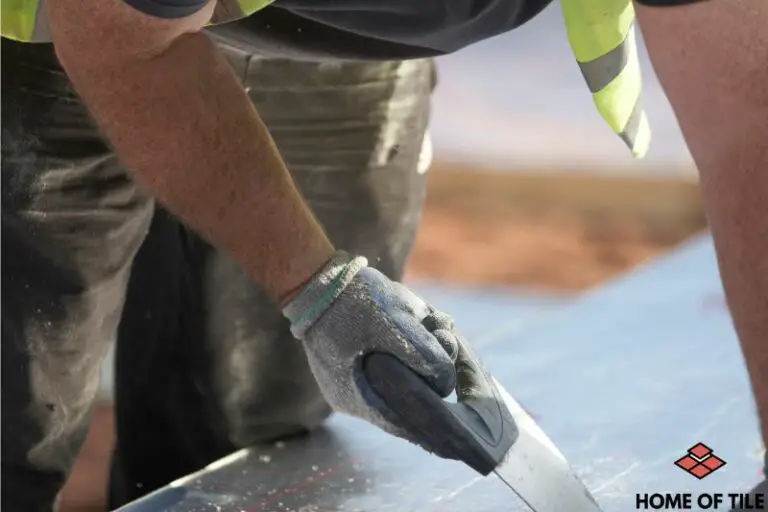
• Step 1: Choose the Right Grout Removal Tool
There are several types of grout removal tools available on the market. Manual grout removal tools are more affordable and ideal for smaller jobs or projects requiring precision. Common manual grout removal tools include:
- Grout saw: A handheld tool with a serrated blade designed for removing grout from small areas or tight spaces.
- Grout rake: A handheld tool resembling a dental pick designed for scraping and chipping away grout.
A power grout removal tool is recommended for larger projects or professional use. These highly efficient tools can greatly reduce the time and effort required to remove grout. Popular power grout removal tools include:
- Oscillating multi-tool with a grout removal blade: A versatile power tool with various attachments, including a blade designed specifically for this task.
- A rotary tool with a grout removal bit: A handheld power tool with a rotating bit specifically designed for grout removal.
• Step 2: Prepare the Area and Safety Precautions
Before starting the grout removal process, ensure the area is clear of any obstacles and cover any surfaces or items that could be damaged by dust or debris. Wear safety goggles and a dust mask to protect yourself against dust and debris.
If using a power grout removal tool, use ear protection, as these tools can be quite loud.
• Step 3: Removing Grout between Tiles
Begin by guiding your chosen grout removal tool along the grout lines, using steady and consistent pressure. For manual tools, apply small, back-and-forth motions to minimize the risk of damaging the tile. For power tools, ensure the blade or bit is set to the proper depth to prevent damaging the tile or substrate beneath.
Work methodically, focusing on one grout line at a time. Be patient and avoid applying too much pressure, as this may damage the tile edges.
Tip: Start in a Less Visible Area
If you’re new to grout removal, start in a less visible area to practice your technique before progressing to more visible portions of your project.
• Step 4: Clean up Debris and Inspect Tiles
Once you’ve removed the grout, use a vacuum cleaner or shop vac to clean up any dust and debris. Inspect your tiles to ensure no damage has occurred during the grout removal process. If tiles are chipped or damaged, consider replacing them before proceeding to the next step.
• Step 5: Re-Grouting the Tiles
Prepare your new grout according to the manufacturer’s instructions. Wearing rubber gloves, use a grout float to apply the grout to the tile joints. Hold the float at a 45-degree angle and press the grout firmly into the joints, ensuring they are completely filled.
Once all joints are filled, use a damp sponge or cloth to remove excess grout from the tile surfaces. Be sure not to remove grout from the joints during this process. Allow the grout to cure fully, as per the manufacturer’s instructions.
• Step 6: Sealing the Grout
After the grout has fully cured, protect it from staining and moisture by applying a grout sealer. Follow the manufacturer’s instructions for applying the sealer, and ensure proper ventilation.
• Conclusion
Removing grout from tile can be time-consuming, but with the proper tools, patience, and technique, it can be accomplished with minimal risk to your tiles. Whether you’re dealing with discolored, cracked, or damaged grout, removing and replacing it will greatly improve the appearance and functionality of your tiled surfaces.
What is the most effortless method to eliminate grout from tiles?
Grout is essential to any tiled surface, providing additional stability and protection from water damage and enhancing the overall appearance. However, tile grout can become discolored or damaged over time, making it necessary to remove and replace it.
I will help you understand the easiest and most effective methods to remove grout from tiles.
• Equipment and Safety Precautions
Before diving into the removal process, gathering the necessary tools and taking proper safety precautions is crucial.
– Tools Needed
- Grout removal tools: Choose between manual grout removal tools, such as a grout rake or a grout scraper, and power tools, like a grout saw or oscillating multi-tool with a grout removal blade.
- Protective gloves: Wearing gloves will help protect your hands from sharp edges while working with grout removal tools.
- Safety goggles: To prevent dust and debris from entering your eyes, always wear safety goggles when working on grout removal tasks.
- Dust mask or respirator: To protect yourself from fine dust and particles produced during the removal process, wear a dust mask or a respirator.
- Vacuum or broom: To clean up any debris after removing the grout.
- Utility knife: Optional but useful for scoring grout lines before starting the removal process.
– Safety Precautions
Before starting the grout removal process, always follow these safety steps:
- Put on all protective gear, including gloves, goggles, and a dust mask/respirator.
- Ensure the workspace is well-ventilated. Open windows or use fans to help dissipate dust.
- Clear the surrounding area of any objects or furniture that could be damaged by dust or debris.
• Step-by-Step Process for Removing Grout from Tiles
– Step 1: Choose Your Grout Removal Tool
Select the appropriate grout removal tool depending on your project’s size and scope. Manual tools like grout rakes or scrapers are best for small areas, while power tools like oscillating multi-tools with grout removal blades are more efficient for larger projects.
– Step 2: Score the Grout Lines (Optional)
Using a utility knife, gently score along the length of the grout lines. This step can help loosen the grout, making it easier for the removal tool to work effectively.
– Step 3: Begin Removing Grout
Start with one grout line, and gently guide your grout removal tool along the line length, applying consistent pressure. Be careful not to damage the surrounding tiles. If you find the grout difficult to remove, try applying more pressure or using a combination of manual and power tools to break it up.
A manual grout rake can be suitable for removing grout between tiles for smaller areas. However, I recommend using an oscillating multi-tool with a grout removal blade for larger projects, as it is a more efficient and faster way to remove grout from tiles.
– Step 4: Monitor Your Progress
As you work, regularly step back to assess your progress, ensuring that the grout is being effectively removed without damaging the surrounding tiles. Adjust your technique, tool, or pressure accordingly if you notice any damage to the tiles or uneven grout lines.
– Step 5: Clean Up Debris
Once you have removed all the necessary grout, use a broom or vacuum to clean up any debris, ensuring the area is free of dust and debris before re-grouting or other home improvement tasks.
• Tips for Effective Grout Removal
- Take time: Rushing through the grout removal process can lead to mistakes, tile damage, or uneven grout lines. Be patient and focus on methodically working your way along each grout line.
- Experiment with different tools and techniques: Finding the most efficient and comfortable method for grout removal might take some trial and error. Don’t be afraid to try different tools or techniques as you work.
- Regularly assess your work: Regularly checking your progress can help you identify any problem areas and adjust your technique or tools.
- Know when to ask for help: If the grout removal process becomes too difficult or overwhelming, consider hiring a professional to ensure the job is done correctly without causing damage to your tiles.
In conclusion, removing grout from tiles can be straightforward with the right tools, technique, and attention to detail. By following these steps and recommendations, you’ll be well on your way to achieving a refreshed, clean look for your tiled surface.
Is it Possible to Remove Grout Without Causing Damage to the Tiles?
The short answer is yes; removing grout without damaging the tile is possible. However, taking care of and following the proper techniques is essential to ensure a successful outcome. I will provide a step-by-step guide on how to remove grout without causing damage to the tile or surrounding areas.
It will also address some key factors to consider and provide tips for maintaining the longevity and appearance of the tile.
• Necessary Equipment and Safety Precautions
Before beginning the grout removal process, gathering the necessary tools and materials is important. These will help to ensure a precise and efficient job:
- Grout Saw or Oscillating Tool with Grout Removal Blade
- Utility Knife
- Vacuum Cleaner or Small Broom
- Safety Goggles
- Dust Mask
- Knee Pads (optional)
Wearing safety goggles and a dust mask is essential, as removing grout can create significant dust and debris. Knee pads are optional but can provide added comfort when working on a floor.
• The Grout Removal Process
The following is a step-by-step guide on how to remove grout without damaging the tile:
1. Initial Grout Line Cleaning
Start using a vacuum cleaner or a small broom to clean the tile surface and remove dust, dirt, or debris from the grout lines. This will make it easier to see the grout lines and prevent debris from interfering with the removal process.
2. Choose the Appropriate Tool
Depending on the size of the grout lines and the project’s scope, a grout saw or an oscillating tool may be more appropriate. A grout saw with a fine blade is recommended for smaller grout lines, especially those with unsanded grout.
An oscillating tool with a grout removal blade can be more efficient for larger grout lines or extended areas.
3. Begin Grout Removal
For manual grout saws, place the blade on the grout line and move it back and forth, applying consistent force. The goal is to cut through the grout without scraping or damaging the tile. With an oscillating tool, set the tool to a low speed and gently place the grout removal blade on the grout line.
Steadily move the blade along the line, being cautious not to apply too much pressure to avoid damaging the tile.
4. Monitor Progress
As the grout is removed, check the progress by slightly angling the tool or saw blade. If grout remains in the joint, additional passes may be necessary. It is also important to inspect the tile for any signs of damage or scratching periodically.
5. Angle the Tool as Needed
For areas where the grout is not coming out easily or corners where the tool may have difficulty reaching, use caution when angling the tool or saw. This can help to remove more grout but should be done carefully to avoid damaging the tile.
6. Clean Grout Lines
Once the grout has been substantially removed, use a vacuum cleaner or small broom to clean the grout lines and remove any lingering debris. This step will help to ensure a clean surface in preparation for new grout.
• Factors to Consider
When removing grout without damaging the tile, there are a few key factors to consider:
- Grout Type: If working with epoxy grout, the removal process may be more challenging due to the strength of the material. In these instances, removing a grout saw or oscillating tool may require additional force and time.
- Tile Material: Harder tile materials, such as porcelain and ceramic, are less likely to be damaged during grout removal. However, softer materials like marble, limestone, or glass may be more susceptible to damage if not handled carefully.
- Tile Age and Condition: Older tiles may be more prone to cracking or chipping during grout removal. It is essential to use caution and monitor the condition of the tile during the project.
• Tips for Maintaining Tile Appearance and Longevity
To preserve the appearance and lifespan of tile after grout removal, consider the following tips:
- Properly seal newly installed grout to prevent future damage and staining.
- Regularly clean tile surfaces and grout lines to maintain the appearance and prevent dirt and debris buildup.
- Address any needed tile repairs or replacements promptly to maintain the overall integrity of the tile surface.
In conclusion, removing grout without damaging the tile is possible with careful planning and the proper techniques. Adhering to the step-by-step guide and considering the critical factors, homeowners can successfully update and maintain their tile surfaces.
Method | Description | Pros | Cons |
|---|---|---|---|
Manual Grout Removal | Using a grout saw or utility knife to manually remove grout | – More control over pressure and speed – Less likely to damage tile | – Time-consuming – May require multiple attempts |
Power Tools | Using a rotary tool or oscillating multi-tool with a grout removal attachment | – Faster grout removal – More efficient | – Potential for tile damage if not used carefully – Requires more skill and experience |
Chemical Grout Removers | Applying a chemical grout remover to soften the grout before removal | – Can make grout removal easier – May help minimize tile damage | – Chemicals can be harsh and potentially harmful – Not effective on all types of grout |
What are the appropriate methods for removing dried grout from tile surfaces?
If you have recently completed a tiling job or had tiles installed in your home, you might have noticed dried grout left on the surface of the tiles. This can be a frustrating problem, as dried grout can ruin the appearance of your beautiful new tiles.
I will discuss various methods to effectively remove dried grout from tiles without damaging them. Let’s get started!
• Use a Soft Cloth or Sponge and Warm Water
Before attempting other methods, always use a soft cloth or sponge dipped in warm water to remove dried grout from tiles. This safe, gentle method is suitable for most tile surfaces.
- First, wet the cloth or sponge in warm water and wring it out so it is damp but not soaking wet.
- Rub the dried grout with a damp cloth or sponge, applying light pressure.
- Rinse the cloth or sponge frequently and continue rubbing until the grout is removed.
- Once the grout has been removed, use a clean, dry cloth to buff the tiles to a shine.
This simple method will often effectively remove dried grout from tiles. However, if the grout residue is stubborn and resistant to this gentle method, you may need to try a slightly more aggressive approach.
• Use a Vinegar and Water Solution
For stubborn dried grout, a mixture of white vinegar and water can help to break down the residue and make it easier to remove. White vinegar is a natural cleaning agent that can be safely used on most tile surfaces.
- Mix a solution of one part vinegar to four parts water in a spray bottle.
- Spray the solution onto the dried grout, ensuring the area is well-saturated.
- Use a soft cloth or sponge to gently scrub the grout residue, reapplying the vinegar solution if necessary.
- Allow the solution to sit on the grout for 5-10 minutes. This will give the vinegar a chance to break down the grout.
- Rinse the tiles with clean water and dry them with a clean cloth.
It’s important to note that you should not use vinegar on natural stone tiles or other surfaces that may be easily damaged by acidic solutions. Always check the manufacturer’s recommendations for your specific tile type before using vinegar.
• Use a Grout Haze Remover
Use a commercial grout haze remover if the vinegar solution does not remove the dried grout from your tiles. These products are designed to remove grout residue and can be found in most hardware or home improvement stores.
- First, choose a grout haze remover appropriate for your tile type. Be sure to read the product instructions and warnings carefully before use.
- Apply the grout haze remover to the tiles per the manufacturer’s recommendations. This may involve spraying, brushing, or wiping the product onto the tiles.
- Let the product sit on the tiles for the recommended time to break down the dried grout.
- Use a soft cloth, sponge, or non-abrasive scrubber to gently scrub the grout residue. Be careful not to apply too much pressure, damaging the tiles.
- Rinse the tiles thoroughly with clean water and dry them with a clean cloth.
Grout haze removers can effectively remove stubborn dried grout from tiles. Just be sure to carefully follow the manufacturer’s instructions and test the product on a small, inconspicuous area first to ensure it will not damage your tiles.
• Use a Plastic Scraper or Nylon Brush
If none of the above methods work, you can try carefully using a plastic scraper or a nylon brush to remove the dried grout. This method will require more elbow grease but can often provide the desired results.
- Gently scrape or brush the dried grout with the plastic scraper or nylon brush, taking care not to scratch or damage the tile surface. Be especially careful when working around grout lines, as you don’t want to dislodge any surrounding grout.
- Continue scraping or brushing until the dried grout is removed.
- Once the grout is gone, wipe down the tiles with a damp cloth or sponge to remove any remaining residue.
- Buff the tiles dry using a clean cloth.
Always use caution when using a plastic scraper or nylon brush on your tiles to avoid damaging the surface. If in doubt, test the scraper or brush on a small, inconspicuous area first to ensure it will not cause damage.
• Prevention is Key
To avoid dealing with dried grout on tiles in the future, it is best to prevent the issue from occurring in the first place. Remove any excess grout from the tile surface when installing tiles or applying fresh grout. Keep a bucket of clean water and a sponge or cloth nearby, and regularly clean the tiles as you work.
By following these recommendations and using the methods provided in this guide, you should be able to successfully remove dried grout from your tiles and restore their beauty. Always try the least aggressive method first and work your way up, being mindful of the specific recommendations for your tile type. Good luck!
What is the Most Effective Technique for Removing Grout?
Grout removal might seem like a challenging and tedious task. However, finding the best method and tools for the job can make the whole process easier and more efficient.
I will discuss various techniques for removing grout and provide recommendations based on personal experience to help you choose the best method for your needs.
• Understanding Grout and Its Importance
Grout is a cement-based product that fills gaps between tiles and provides a protective seal. It is crucial for maintaining the structural integrity and appearance of tiled surfaces.
Over time, grout can become damaged or discolored due to age, harsh cleaning chemicals, or excessive moisture exposure, necessitating its removal and replacement.
• Types of Grout
Before deciding on a removal method, you must know the type of grout you are working with. There are two primary types of grout: sanded and unsanded. Sanded grout is made of cement and sand, making it stronger and more resistant to cracking.
On the other hand, unsanded grout does not contain sand and is used for smaller, more delicate spaces between tiles.
Knowing the type of grout used in your project helps determine the appropriate removal tools and techniques to prevent damage to the tiles.
• Safety Precautions
Before beginning any grout removal project, always prioritize safety. Wear protective gear, such as safety glasses, gloves, and a dust mask, to prevent injuries and exposure to dust particles. Similarly, ensure that the workspace is well-ventilated to minimize the risk of respiratory issues.
• The Best Grout Removal Techniques
Below are some of the most popular grout removal methods, along with their respective advantages and disadvantages:
– Manual Grout Removal
This approach involves using handheld tools, such as a grout saw, grout scraper, or utility knife, to manually scrape away the grout. Manual removal can be effective for small-scale projects or fragile tiles.
Advantages:
- Inexpensive
- Minimal risk of tile damage
- Suitable for smaller projects
Disadvantages:
- Time-consuming
- Physically demanding
- Can be challenging for larger or more challenging grout lines
– Oscillating Multi-Tool
An oscillating multi-tool with a grout removal attachment is a popular choice for efficient grout removal. It works by quickly vibrating the attached tool and effectively breaking up and removing the grout.
Advantages:
- Faster than manual methods
- Lower risk of tile damage when used correctly
- Suitable for most grout types and project sizes
Disadvantages:
- More expensive than manual methods
- May require some practice to use it effectively
– Rotary Tool with Grout Removal Bit
A rotary tool, such as a Dremel, outfitted with a specialty grout removal bit can provide professional-quality results. This method is particularly useful for intricate tile work or delicate tiles.
Advantages:
- Precise control and accuracy
- Suitable for delicate tiles
- Faster than manual methods
Disadvantages:
- More expensive than manual methods
- May require a steady hand and practice
– Angle Grinder with Diamond Blade
An angle grinder fitted with a diamond blade can offer a fast and efficient means of grout removal. This method best suits heavy-duty grout removal projects or cutting through exceptionally tough grout.
Advantages:
- Highly effective for tough grout or large-scale projects
- Fastest method for grout removal
Disadvantages:
- Requires experience and practice
- Higher risk of tile damage
- Noisy and generates significant dust and debris
• Personal Recommendations
Based on my experience, using an oscillating multi-tool with a grout removal attachment is a versatile and efficient choice for most tasks. This method offers speed and control, and with some practice, it can be safe and effective on a wide range of tile types and projects.
A rotary tool with a grout removal bit might be better for delicate or intricate tile work. It provides the most precise control and minimizes the risk of tile damage.
Manual tools should be considered for small, targeted projects or very delicate tiles, while angle grinders should be reserved for professionals or when dealing with exceptionally tough or hardened grout.
In conclusion, selecting the best method for grout removal depends on various factors, including the type of grout, tile materials, project size, and your experience and comfort level with using power tools. Prioritize safety, practice, and patience to achieve the best possible results in your grout removal endeavor.
Method | Description | Pros | Cons |
|---|---|---|---|
Manual Grout Removal Tools | More expensive, requires electricity, and might need additional attachments | Cheap, no need for electricity, precise control | Time-consuming, labor-intensive, risk of damaging tiles |
Oscillating Multi-tool | Tools like grout saws, scrapers, or utility knives are used to remove grout manually. | Fast, efficient, less chance of damaging tiles | More expensive, requires electricity, and risk of damaging tiles if not careful |
Rotary Tool with Grout Removal Attachment | A high-speed rotary tool with a specialized grout removal bit. | Fast, precise control, efficient | Tools like grout saws, scrapers, or utility knives manually remove grout. |
Electric Grout Remover | Specialized power tool specifically designed for removing grout. | A power tool with a specialized grout removal blade that vibrates at high speed. | Most expensive, requires electricity, might be overkill for small projects |