Rubber Tiles Outdoor. 25 things you should know
Are you tired of conventional, dull outdoor flooring options? Welcome to the world of rubber tiles – a sustainable and versatile solution for your outdoor living spaces! In this blog post, we delve into the numerous benefits of rubber tiles, including exceptional slip resistance, long-lasting durability, and easy installation. You’ll also find tips on choosing the most suitable rubber tiles for your patio, playground, or walkway.
Rubber tiles outdoor:
Outdoor rubber tiles offer a safe, comfortable, and durable flooring solution for various applications such as playgrounds, rooftops, and gyms. Made from natural and recycled rubber materials, these eco-friendly tiles provide slip resistance, impact absorption, and weather resistance. Key advantages include safety, durability, easy maintenance, and eco-friendliness.
Proper installation, drainage, and regular cleaning are essential for maintaining their appearance and functionality in diverse outdoor environments.

Delve into the world of versatile rubber tiles tailored for outdoor spaces! Discover their unique benefits, various applications, and helpful tips to make informed choices. Enhance functionality, aesthetics, and safety in your exteriors with reliable rubber flooring solutions.
Contents
- 1 Outdoor Rubber Tiles for Exterior Spaces
- 2 Is Rubber Tile Suitable for Outdoor Applications?
- 3 What is the Durability and Lifespan of Outdoor Rubber Tiles?
- 4 What are the potential drawbacks of rubber flooring?
- 4.1 • High Initial Installation Cost
- 4.2 • Limited Aesthetic Appeal
- 4.3 • Susceptibility to Staining and Discoloration
- 4.4 • Potential for Off-Gassing
- 4.5 • Heat Insulation Issues
- 4.6 • Susceptibility to Damage from Heavy Objects
- 4.7 • Environmental Concerns
- 4.8 • Limited Suitability for Outdoor Use
- 4.9 • Summary
- 5 Is it Possible to Install Rubber Flooring Over a Concrete Surface?
Outdoor Rubber Tiles for Exterior Spaces
• Introduction to Rubber Tiles Outdoor
Outdoor rubber tiles provide a safe, comfortable, and durable flooring solution for various applications, such as playgrounds, rooftop terraces, and gyms. These eco-friendly tiles are made from natural and recycled rubber materials, which offer numerous benefits, such as slip resistance, impact absorption, and weather resistance.
This guide provides an in-depth understanding of outdoor rubber tiles and their advantages, installation process, maintenance, and various applications.
• The Advantages of Rubber Tiles Outdoor
– Safety
Outdoor rubber tiles are safe and slip-resistant, making them an ideal flooring choice for areas where children and adults may be prone to slips and fall. The material’s textured surface provides added traction, even when wet.
The impact-absorbing qualities of rubber further enhance safety by minimizing the risk of injuries from falls.
– Durability
Rubber tiles are highly durable and can withstand harsh weather conditions, including extreme temperatures, rain, snow, and ultraviolet rays. They don’t expand or contract, which prevents them from cracking or warping.
Additionally, the tiles are resistant to mold and mildew, offering a long-lasting flooring solution.
– Comfort
The cushioning effect of rubber tiles offers a comfortable walking and playing surface, reducing the overall strain on the feet, ankles, and legs. This makes them suitable for playgrounds and other outdoor locations where individuals may spend extended periods standing or walking.
– Easy Maintenance
Rubber tiles are low maintenance and can be cleaned using a simple water and detergent solution. They do not require special cleaning products, and sweeping or vacuuming debris is usually enough to keep them looking good.
When installed with proper drainage, rubber tiles dry quickly, minimizing the growth of mold and mildew.
– Eco-friendly
Many rubber tiles are made using recycled materials, including old tires and other rubber waste. This helps reduce waste in landfills and promotes a greener environment. Moreover, rubber tiles can be recycled at the end of their lifespan, contributing to the circular economy.
• Installing Rubber Tiles Outdoors
– Preparing the Surface
Before installing the rubber tiles, it’s essential to ensure the existing surface is clean, dry, and level. Remove any debris, dirt, or loose particles from the installation area. Patch any significant cracks or holes beforehand for concrete or other hard surfaces.
– Choosing the Right Tiles
Outdoor rubber tiles come in various thicknesses, designs, and colors. Select the appropriate thickness based on the intended use and expected foot traffic. Thicker tiles offer more impact absorption, making them suitable for playgrounds, while thinner tiles suffice for walkways or rooftops.
– Proper Drainage
It’s essential to ensure adequate drainage to prevent water accumulation, which can lead to mold and mildew growth. Some rubber tiles have built-in drainage channels, allowing water to flow freely beneath the tiles. Alternatively, a permeable underlayment can be added to facilitate drainage.
– Installation Process
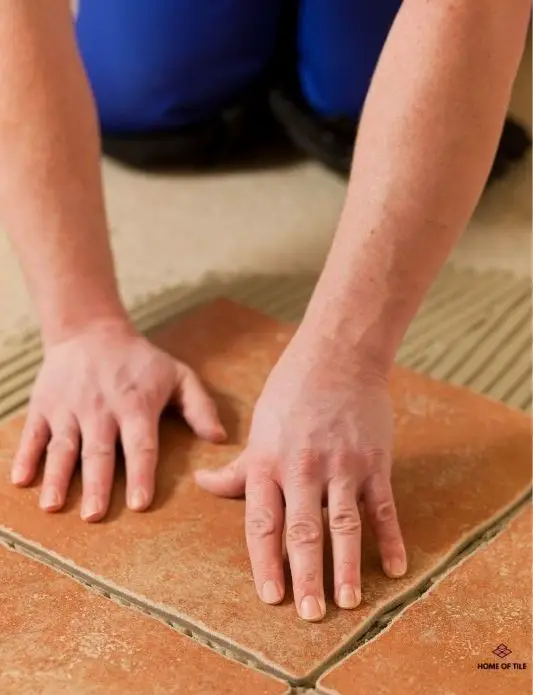
The rubber tiles can be glued to the surface or joined using an interlocking system. First, lay out the tiles to determine the best positioning and align them correctly. When gluing the tiles, spread the adhesive onto the surface and then press each tile firmly into place.
Interlocking tiles can be connected by simply aligning and pressing the tabs.
• Maintaining Outdoor Rubber Tiles
Regular maintenance will keep your rubber tiles looking good and functioning well. Follow these basic maintenance tips:
- Sweep or vacuum the area frequently to remove dirt and debris.
- Clean the tiles with a mild soap and water solution using a mop or sponge.
- Use a gentle brush to scrub the surface for stubborn stains or dirt.
- Rinse the tiles thoroughly with clean water and let them air dry.
• Applications of Rubber Tiles Outdoor
Outdoor rubber tiles are a versatile flooring option and can be used for various applications, including:
- Playgrounds: Offer a safer, more comfortable playground surface for children.
- Rooftop terraces: Transform unused rooftops into attractive, usable spaces.
- Gyms and fitness areas: Provide comfortable and safe flooring for exercising.
- Patios and decks: Add a slip-resistant and durable surface for entertaining and relaxing.
- Walkways and paths: Create safe and low-maintenance walkways in gardens or public spaces.
• Final Thoughts
In conclusion, outdoor rubber tiles are an excellent choice for numerous applications thanks to their safety, durability, comfort, low maintenance, and eco-friendliness.
Proper installation and regular cleaning will ensure that your rubber tiles provide a lasting and attractive flooring solution to flourish in diverse outdoor environments.
Is Rubber Tile Suitable for Outdoor Applications?
Rubber tiles are an increasingly popular flooring option due to their durable and eco-friendly nature. As a result, many homeowners are considering them for their outdoor spaces.
I will explore the suitability of rubber tiles for outdoor use, their benefits and drawbacks, and tips for installation and maintenance.
• Benefits of Rubber Tiles for Outdoor Use
Rubber tiles offer numerous advantages which make them an ideal choice for outdoor applications, including the following:
– Durability and Resilience
Rubber tiles are made from heavy-duty, high-quality materials resistant to wear and tear. This makes them an excellent choice for outdoor spaces such as patios, playgrounds, and walkways.
– Slip-Resistance
Rubber tiles provide excellent traction due to their slip-resistant surface. This feature is very important for outdoor use, as wet or slippery conditions can pose a significant risk of accidents.
– Shock Absorption
Rubber tiles’ key benefits are their ability to absorb shock and minimize impact, making them a popular choice for playgrounds and sports facilities. They can also relieve those with joint or muscle pain, making them ideal for providing comfort when walking or standing on hard surfaces outdoors.
– Noise Reduction
Rubber tiles are known for their sound-absorbing properties, effectively reducing noise by dampening vibrations. This feature makes them an excellent choice for outdoor spaces where noise levels may be a concern: residential environments or public recreational areas.
– Easy Installation and Maintenance
Rubber tiles can be easily installed on concrete, asphalt, and compacted soil or gravel surfaces. Additionally, they can be quickly removed and replaced if damaged, making them a cost-effective and low-maintenance option.
• Drawbacks of Rubber Tiles for Outdoor Use
While rubber tiles present many benefits for outdoor use, it is important to consider some drawbacks before deciding to use them:
– UV Exposure and Color Fading
Prolonged exposure to sunlight can cause rubber tiles to degrade over time, leading to color fading and decreased performance. However, companies now offer UV-stabilized tiles, helping minimize this issue.
– Temperature Sensitivity
In extreme weather conditions, rubber tiles can undergo some expansion and contraction. This can cause the tiles to move or shift if not properly installed or if expansion gaps are not allowed.
– Water Accumulation
Poor drainage can lead to water pooling on the surface of rubber tiles. This can cause slippery conditions and potential damage to the tiles if not addressed properly.
• Tips for Installing and Maintaining Outdoor Rubber Tiles
To ensure the best performance and longevity of rubber tiles outdoors, follow these installation and maintenance tips:
– Installation:
- Choose high-quality tiles: Select tiles specifically designed for outdoor use and opt for UV-stabilized tiles to minimize color fading.
- Prepare the surface: The surface on which rubber tiles are installed should be clean, flat, and debris-free.
- Plan for expansion gaps: Rubber tiles can expand and contract due to temperature fluctuations, allowing expansion gaps during installation.
- Properly secure the tiles: It is important to properly adhere or lock them to prevent movement or shifting.
- Ensure adequate drainage: If installing on a surface with potential water accumulation, ensure sufficient drainage is in place to prevent water from pooling on the surface of the tiles.
– Maintenance:
- Clean regularly: Sweep or use a leaf blower to remove dirt and debris from the rubber tile surface.
- Wash periodically: Use soap and water with a soft-bristle brush or mop to clean the tiles. Avoid any abrasive cleaners, as these can cause damage to the tiles.
- Inspect for damage: Regularly inspect the tiles for any signs of damage or wear, and replace any tiles that display excessive degradation.
- Protect from heavy loads: Avoid placing heavy objects, such as large planters or grills, on rubber tiles, as these can cause indentations or damage.
• Conclusion
Rubber tiles can be successfully used outdoors, offering a variety of benefits such as slip resistance, durability, shock absorption, and noise reduction. However, selecting the appropriate type of tile, installing it correctly, and maintaining it properly to ensure optimal performance and longevity is essential.
Considering this guide’s benefits, drawbacks, and maintenance tips, rubber tiles can be an excellent addition to outdoor spaces, creating a safe and comfortable environment for various activities.
What is the Durability and Lifespan of Outdoor Rubber Tiles?
• A Brief Overview of Outdoor Rubber Tiles
Outdoor rubber tiles are a versatile and durable flooring option for various outdoor applications such as playgrounds, recreational areas, gyms, patios, and walkways. They are designed to withstand harsh outdoor conditions while providing users a safe and comfortable surface.
These tiles are made from recycled rubber materials, making them an eco-friendly solution for your outdoor spaces.
I will discuss the factors that affect the lifespan of outdoor rubber tiles and offer some tips on maintaining and prolonging their durability.
• Factors Affecting Outdoor Rubber Tiles Lifespan
1. Quality of Rubber Materials
The quality of rubber materials used in producing outdoor rubber tiles significantly determines their lifespan. High-quality rubber materials are more resistant to wear, tear, and environmental factors, ensuring the tiles remain durable and functional for longer.
On the other hand, low-quality materials tend to deteriorate faster and might need frequent replacements. Investing in tiles made from high-quality rubber materials is highly recommended to get the best value for your money.
2. Exposure to Environmental Factors
Outdoor rubber tiles are usually exposed to various environmental factors, such as sunlight, rain, extreme temperatures, and humidity. These factors can affect the durability and longevity of the tiles. For instance, prolonged exposure to sunlight can lead to the degradation of rubber materials, while moisture can cause the growth of mold and mildew, which can weaken the tiles’ structure.
Generally, good quality outdoor rubber tiles can last 5-10 years in moderate climates. However, their lifespan can be much shorter in highly humid, hot, or cold environments.
3. Usage Patterns and Traffic
The frequency and intensity of usage also impact the lifespan of outdoor rubber tiles. Areas with heavy foot traffic or subjected to heavy equipment use may cause faster wear and tear on the tiles, reducing their lifespan.
Installing tiles with adequate thickness and density in high-traffic areas can help increase their durability and longevity.
4. Proper Installation
Installing outdoor rubber tiles is crucial to ensure optimal performance and a long lifespan. If tiles are not installed properly, they can move, shift or develop gaps, leading to decreased longevity. Following the manufacturer’s installation guidelines and seek professional assistance if necessary.
• Maintenance Tips to Prolong Outdoor Rubber Tiles Longevity
To get the most out of your outdoor rubber tiles investment and ensure their long-lasting performance, follow these maintenance tips:
1. Regular Cleaning
Keep your outdoor rubber tiles clean by regularly sweeping away dirt, dust, and debris. Use a mild detergent mixed with water to mop the tiles occasionally.
Avoid harsh chemicals or abrasive cleaners, as they can damage rubber materials. For stubborn stains, you can use a soft-bristle brush to gently scrub the affected area.
2. Sealing
Applying a rubber sealant can help protect your outdoor rubber tiles from the damaging effects of sunlight, moisture, and other environmental factors. Sealants can also enhance the tiles’ appearance, making them look fresh and vibrant.
Ensure you follow the manufacturer’s guidelines on your tiles’ recommended sealant type and application process.
3. Promptly Address Repairs
Small repairs, such as fixing minor tears or reattaching loose tiles, should be addressed immediately to prevent further damage. If you notice any significant damage, consider replacing the affected tiles to maintain your outdoor space’s overall appearance and functionality.
4. Rotate Tiles
If your outdoor rubber tiles are used in an area with uneven traffic patterns, consider rotating the tiles periodically to promote even wear and tear.
Swapping out tiles from high-traffic areas with those from low-traffic areas can help prolong the lifespan of the tiles and maintain a consistent appearance across the entire surface.
5. Follow the Manufacturer’s Recommendations
It is essential always to follow the manufacturer’s recommendations for the specific product you are using. Different outdoor rubber tiles may have unique maintenance requirements or limitations depending on their materials and construction.
Consult your tile manufacturer’s guidelines for specific information regarding cleaning, sealing, or any other maintenance practices.
• The Bottom Line
Outdoor rubber tiles are a popular and durable flooring option that can last many years with proper care and maintenance. The lifespan of these tiles can be affected by factors such as the quality of rubber materials, exposure to environmental factors, usage patterns, and proper installation.
By following the recommended maintenance practices and addressing any repairs promptly, you can significantly prolong the lifespan of your outdoor rubber tiles, ensuring that they remain a functional and attractive addition to your outdoor spaces for years to come.
Type of Rubber Tile | Estimated Lifespan |
|---|---|
Recycled Rubber Tiles | 5-10 years |
Virgin Rubber Tiles | 10-15 years |
EPDM Rubber Tiles | 15-20 years |
What are the potential drawbacks of rubber flooring?
Rubber flooring can be an excellent choice for spaces like gyms, playrooms, and commercial facilities. However, despite its numerous advantages, there are several notable disadvantages to using rubber flooring.
I will explore each of these disadvantages in detail, providing insight into potential concerns that one might face when considering rubber flooring as a flooring option.
• High Initial Installation Cost
One of the most significant drawbacks of rubber flooring is its high initial installation cost. This is because rubber flooring materials are more expensive than other options, such as laminate, carpet, or hardwood.
Rubber flooring often requires professional installation, which can add to the total cost. As a result, rubber flooring may not be the most cost-effective option, particularly for those on a tight budget.
• Limited Aesthetic Appeal
With limited design options, rubber flooring is generally not considered the most visually appealing. While the material can mimic other surfaces such as wood, tile, or stone, the overall design choices are still considerably more limited than those of other materials.
This may be a disadvantage for those looking to create a specific aesthetic or for use in areas where appearance is highly important.
• Susceptibility to Staining and Discoloration
While rubber flooring is resistant to many liquids, it is still susceptible to staining and discoloration from certain substances. Oil-based materials, such as grease and petroleum products, can cause discoloration and damage to rubber flooring.
Similarly, rubber flooring can be stained by certain chemicals and acidic substances. For this reason, I recommend being cautious about the substances that come into contact with your rubber flooring and cleaning up spills promptly.
• Potential for Off-Gassing
Some rubber flooring products can emit a strong odor, sometimes called “off-gassing,” caused by releasing volatile organic compounds (VOCs) from the flooring material. This odor can be particularly strong for newly installed flooring, potentially leading to discomfort for some individuals.
While the off-gassing odor typically dissipates over time, ensuring proper ventilation during and after installation is essential to mitigate this issue.
• Heat Insulation Issues
Rubber flooring is not the best heat insulator for other flooring materials, such as carpet or hardwood. This is because rubber flooring tends not to retain heat or other materials.
Rubber floorings in areas that require warmth, such as living spaces or bedrooms, may not be ideal, especially in colder climates.
• Susceptibility to Damage from Heavy Objects
While rubber flooring is durable and can withstand considerable wear and tear, it is not immune to damage from heavy objects. Heavy furniture or equipment, for example, can cause indentation marks on rubber flooring.
Furthermore, sharp objects like high-heeled shoes, pet claws, or dragging heavy items across the floor can cause gouges or punctures in rubber flooring. To avoid these types of damages, I recommend using proper floor protection, like using furniture pads, mats, or casters for heavy items, and being mindful of sharp objects on the floor.
• Environmental Concerns
Although rubber flooring can be made from environmentally friendly materials, such as recycled rubber, it is not always the most eco-friendly option. The production process can involve harmful chemicals, leading to environmental concerns.
Moreover, certain rubber flooring materials are non-biodegradable and do not break down over time, contributing to ongoing environmental issues.
• Limited Suitability for Outdoor Use
Rubber flooring is not generally recommended for outdoor use due to its susceptibility to damage from UV radiation and extreme temperatures. Exposure to direct sunlight can cause rubber flooring to fade, become discolored, or even break down over prolonged periods.
Additionally, very low or high temperatures can cause the flooring to contract or expand, potentially leading to damage or unsafe conditions. Therefore, rubber flooring is the best option for indoor applications only.
• Summary
In conclusion, rubber flooring offers many advantages, such as durability, shock absorption, and slip resistance, making it suitable for specific environments like gyms or playrooms.
However, it is essential to be aware of its disadvantages, such as high initial costs, limited aesthetic appeal, susceptibility to staining, off-gassing concerns, inadequate heat insulation, the potential for damage, environmental concerns, and limited outdoor suitability.
By carefully considering these factors, you can decide whether rubber flooring is the right choice for your space.
No. | Disadvantage |
|---|---|
1 | Expensive initial cost |
2 | Possible odors due to off-gassing |
3 | Slippery when wet |
4 | Not resistant to oil and solvents |
5 | Requires regular specialized maintenance |
6 | Difficult to install on existing floors |
7 | Potential allergic reactions for some individuals |
Is it Possible to Install Rubber Flooring Over a Concrete Surface?
Rubber flooring has gained popularity over the years due to its durability, low maintenance, and numerous applications. It’s often used in commercial environments like gyms, schools, and offices but has become increasingly popular in homes.
When considering rubber flooring, one question arises is whether it can be installed over existing concrete floors. The short answer is yes, but there are several factors to consider and steps to follow to ensure a successful installation.
I will discuss the process of installing rubber flooring over concrete, the advantages and disadvantages of rubber flooring, and the best types of rubber flooring products to use on concrete surfaces.
• Preparing the Concrete Subfloor for Rubber Flooring
Before installing rubber flooring over concrete, it’s essential to ensure the concrete surface is clean, smooth, and level. Following are the steps for preparing the concrete subfloor:
1. Inspect the Concrete Surface
Before starting any work, closely examine the concrete surface for any signs of damage, cracks, or moisture. Rectify any issues before proceeding, as these can lead to uneven flooring and cause further damage in the long run.
2. Clean the Concrete Subfloor
Cleaning the concrete surface is essential to ensure proper adhesion of the rubber flooring. Remove debris, dirt, or stains using a broom, vacuum, or mop. Any existing adhesives, paint, or sealers should be removed using appropriate chemicals or mechanical methods.
3. Level the Concrete Surface
A level concrete surface is crucial for the proper installation of rubber flooring. If you notice uneven areas, holes, or cracks, fill them with a high-quality concrete patching compound. Once the compound has dried, use a floor grinder or sanding machine to create a smooth surface.
4. Test for Moisture
One of the main concerns when installing rubber flooring over concrete is moisture. Testing the concrete surface for moisture content is crucial before installation begins. This can be done using calcium chloride or relative humidity probe tests.
If the results indicate high moisture levels, use moisture mitigation products or water-resistant adhesives specifically designed for installing rubber flooring on concrete.
• Advantages of Rubber Flooring Over Concrete
There are several benefits of installing rubber flooring on concrete surfaces. Some of these include:
1. Comfort and Shock Absorption
Rubber flooring offers a softer and more comfortable surface than concrete, making it ideal for areas where people stand for long periods. Additionally, the shock-absorbing quality of rubber flooring reduces the risk of injuries in gyms and playgrounds.
2. Durability
Rubber flooring is highly durable, making it perfect for high-traffic areas. It can withstand heavy loads and resist wear and tear, ensuring it lasts for several years.
3. Noise Reduction
Rubber flooring effectively dampens noise, making it ideal for settings where noise control is essential, such as apartments or office buildings.
4. Slip Resistance
The innate slip-resistant quality of rubber flooring makes it suitable for areas prone to moisture or spills, such as kitchens, bathrooms, or commercial kitchens.
• Disadvantages of Rubber Flooring Over Concrete
Despite its numerous benefits, there are some drawbacks to using rubber flooring on concrete surfaces:
1. Installation Cost
Installing rubber flooring over concrete can be more expensive than some other flooring options, especially when factoring in the cost of subfloor preparation and specialized adhesives.
2. Inaccurate Measurements
Measuring and cutting rubber flooring materials can be challenging, resulting in inaccuracies and potentially wasting materials.
3. Susceptibility to Staining
Although rubber flooring is water-resistant, it can still be susceptible to staining from certain chemicals or substances. Therefore, it may not be the best choice for areas with common heavy chemicals or oil spills.
• Types of Rubber Flooring Suitable for Concrete Surfaces
There are three main types of rubber flooring products suitable for concrete surfaces:
1. Rubber Tiles
Rubber tiles are an excellent choice for do-it-yourself projects, as they are relatively easy to install and come in various colors and patterns. They have an interlocking design, allowing for seamless connections between tiles.
2. Rubber Sheet Flooring
Rubber sheet flooring is available in large rolls that can cover substantial areas. It suits commercial or industrial applications and provides a seamless and professional finish.
3. Rubber Mats
Rubber mats are smaller, pre-cut sections of rubber flooring that can be easily placed over specific concrete floor areas. They are suitable for smaller spaces or areas requiring specific protection, such as areas in gyms or entryways.
• Final Thoughts – Can I Put Rubber Flooring Over Concrete?
In conclusion, rubber flooring can be installed over concrete surfaces, provided the concrete subfloor is adequately prepared and suitable rubber flooring products are used.
The benefits of rubber flooring, such as comfort, durability, and slip resistance, make it an excellent choice for various applications. However, be prepared for the potential challenges, such as higher installation costs and the risk of staining.
By following the steps and recommendations in this blog post, you will be well-equipped to decide to install rubber flooring over your concrete surface.